Quantcast
Channel: John Mark Power, Antiques Conservator
Viewing all 57 articles
Browse latest View live

Stickley Music cabinet (2014)

$
0
0
The completed Music Cabinet


Recently I was commissioned by a customer to build a reproduction of a Stickley music cabinet no.70, which was first produced by the Gustav Stickley Furniture Company around the turn of the 20th century. The purpose of the cabinet was to store sheet music next to a piano and the one I was commissioned to make would be used exactly for that purpose.

The cabinet was made in many forms, sometimes with a solid panel front and other times with 10 glass panes. The one that the customer liked the best was probably not completely in it's original form. The surface had been ebonized  and the lights, which were probably originally amber glass, had been replaced by panels comprised of four panes divided by lead came, the same material used in stained glass windows. Below is a photo of the cabinet that the customer had seen.
 
Looking around on the internet,  I found a wonderful article written in February of 2010 for Popular Woodworking Magazine by Robert Lang concerning the very cabinet and its construction. Mr. Lang has produced measured drawings of many arts and crafts pieces, and explained in detail how he had built this cabinet. A link to the plans (which can be purchased) is listed below:

http://www.shopwoodworking.com/stickley-music-cabinet-u4653

In addition to this, Mr. Lang produced a rendering of his cabinet in Sketchup, a design software I use to design furniture. Using his original sketches,  I made the necessary changes to the design to suit the customers needs and presented the drawings below.


At the time we were unsure if the individual panes would be subdivided like they were in the photo, so I did not draw this. Besides the difference in cosmetics, I also chose a simpler method of joinery on the door than Mr. Lang designed for his cabinet. Hats off to him for his mitred mullions and muntins!

On that note, if you are interested in seeing some of Robert Lang's measured Drawings, several of his books are available on his website. I highly recommend "Great Book of Shop Drawings for Craftsman Furniture". Here is a link to his site:

http://craftsmanplans.com/Furniture%20Plans_4.htm 

The first step in building the cabinet was the selection of material. Stickley used Quartersawn White Oak in the majority of his work and this was requested by the customer so I bought some beautiful wood from my friend Rick at Herbine Hardwoods (http://www.herbinehardwood.com/). After looking over the wood, I figured out what boards would be used for which part and cross cut the boards a little over size. This helped me to conceptualize each component and also made it easier to work with the wood in my confined shop! Below is the stack of lumber after cross cutting.


After milling the lumber to the required thickness, the next step was to glue up the large panels. Below are photos of the side panels, the back panel, the top and bottom panel, and the shelves being glued.


 Creating the sides, top, and bottom

One of the great functions of Sketchup is the ability to create real templates from drawings in the program. I needed to transfer the profiles for the top and bottom edge of the side panels as well as the mortise locations for the mortises that connect the side panels to the top and bottom. The mortises were the same in length so I combined the two sets into one with the most important parts being the size of the mortises and the distance from the top edge and the bottom edge.

By resizing the face of one of the side panels in the drawing, I was able to create a template that satisfied all of my requirements. Here is an image of that template in the program.

Using add on software for the Sketchup program, I was able to create printouts of this on letter sized paper. Because the template is larger than a letter size sheet of paper, the program adds registration marks to the template to ease with lining up the image. I printed it out on transparent full sheet labels with adhesive on one side and attached the sheets to a piece of MDF (medium density fiberboard) that would serve as the template. In the photo below you can see the piece of MDF with the template adhered to it.
After the labels were adhered, I cut along the outside lines and then took an idea from Bob Lang to build around the mortise locations with wood blocks adhered with double stick tape. These would serve as a guide for the router when creating the mortises in the template. The template can be seen with the guides in place and starter holes drilled in the mortise locations.
Because of the bit I had to use I had to do the routing with the template upside down, as seen below.

Once the template was completed , I attached it to a side panel, rough cut the required profiles with a jig saw, and cleaned the profiles up with a router and a flush cut bit. While the template was still attached, I cut the mortises using a smaller flush cut bit on a second router, In each instance, the template served as a guide, and the router created an exact duplicate of the shape I needed. After the routing was done, the corners of the mortises were squared off with a chisel as seen below.


The next step was to create the through tenons that would join the top and bottom panel to the side panels. I did this using a trick I learned from another project, which was to use a dado stack installed in the table saw, but replace the stacking blades in the center with a MDF shim 1/2" in thickness. This basically converts the stack into two blades on the saw running simultaneously and parallel to  each other and the fence. Using a sled on the fence, I passed the top and bottom panel over the blades, which cut the shoulders of the tenons. They were all aligned and the proper thickness and all of the long shoulders cut when completed. Below are a few photos of that process.


After the shoulders were cut I used a jig saw,a router, and finally a hand saw to cut away the unnecessary parts of the wood, leaving two tenons on either edge of the top and bottom panels. 

The last step before dry assembling the case was to create a stopped rabbit on the back edge of the side panels to receive the back panel. After I had finished this I assembled the side panels, top and bottom dry to take measurements to construct the back panel.

Creating the back panel

The back panel is composed of rails and stiles that frame a center floating panel. The joinery included what is known as a haunched tenon, that from the outside looks short, but on the interior plunges deep into the stile to give good strength to the panel. Below is a photo of that tenon.

This photo shows the frame and panel being glued up.


Once the panel was glued, I fit it to the back of the assembled case as seen in the photos below.

Constructing the Door

As hinted at earlier, Robert Lang used mitered lap joinery to join the mullion (vertical divider) with the muntins (horizontal dividers) on the door. I decided to go with a straight lap joint at these intersections, which was how the piece my customer presented to me was constructed. While the mitered joinery would have proved an interesting challenge, standard lap joints were challenging enough! 

After constructing the outer frame of door I figured out the spacing of the muntins and cut the tenons on the end of each board. 

Because the inner edge of the door frame was rabbeted to receive the glass panel, the tenons on the muntins and mullions all had to have uneven shoulders as seen below.
This next photo shows all of the tenons cut on the four muntins and the one mullion.

The next step was to cut the mortises for these tenons. I decided to install the vertical mullion first since it overlapped the muntins. This would make layout easier on the muntins.
Here I have removed the mullion and am installing the muntins.
Once all of the tenons had corresponding mortises, I needed to create the lap joint where all of the dividers intersected. I first laid the muntins face to face with the mullion and scribed the edges where they intersect. I then used a dado stack on the table saw to remove most of the waste. Cutting to the exact line was achieved using a chisel and a hand saw as seen below.

The completed muntins.
Once in place I was able to scribe and cut the corresponding joinery on the mullion.
The completed door.

Case Construction
 As the door was clamped and drying I went back to the case to make final changes to the case and glue it up. The first step was to drill the holes for the adjustable shelves. The alignment of these holes was aided by a jig sold by Rockler hardware as seen in the photo below.
Another detail was the chamfering of the edges on the through tenons. While the case had been test fit, I drew a line where the case met the edge of the tenons. Once removed, I measured off of that line and split the difference from the outer end of the tenon and cut the beveled edge, as seen in the photos below.

These next two photos show the case being glued. The blue tape helped with cleaning up glue squeeze out.

This shot shows the completed tenon.
After the case had dried, I pegged the four intersecting corners on the front of the case. These pegs were later cut off flush with the case.

These next two photos show the back splash and kick board being glued in place.


The last steps were to hang the door and install the hardware after that the case was comlpleted

Making the glass panels

The panels were comprised of four small glass panes taken form old window glass. This glass was selected because of the waves and bubbles that are found in old glass. The panes were held in place by a frame made from lead came used to make stained glass panels. Once the individual panes were cut I cut the frame of lead to fit around them. I then tacked the assembled frame in place on a board while I soldered the joints. Below is a photo of one of the assembled panels ready for soldering.
After the panels were soldered I used stained glass cement to tighten up the panes and when finished, I had ten panels ready to install.
Staining and finishing the cabinet

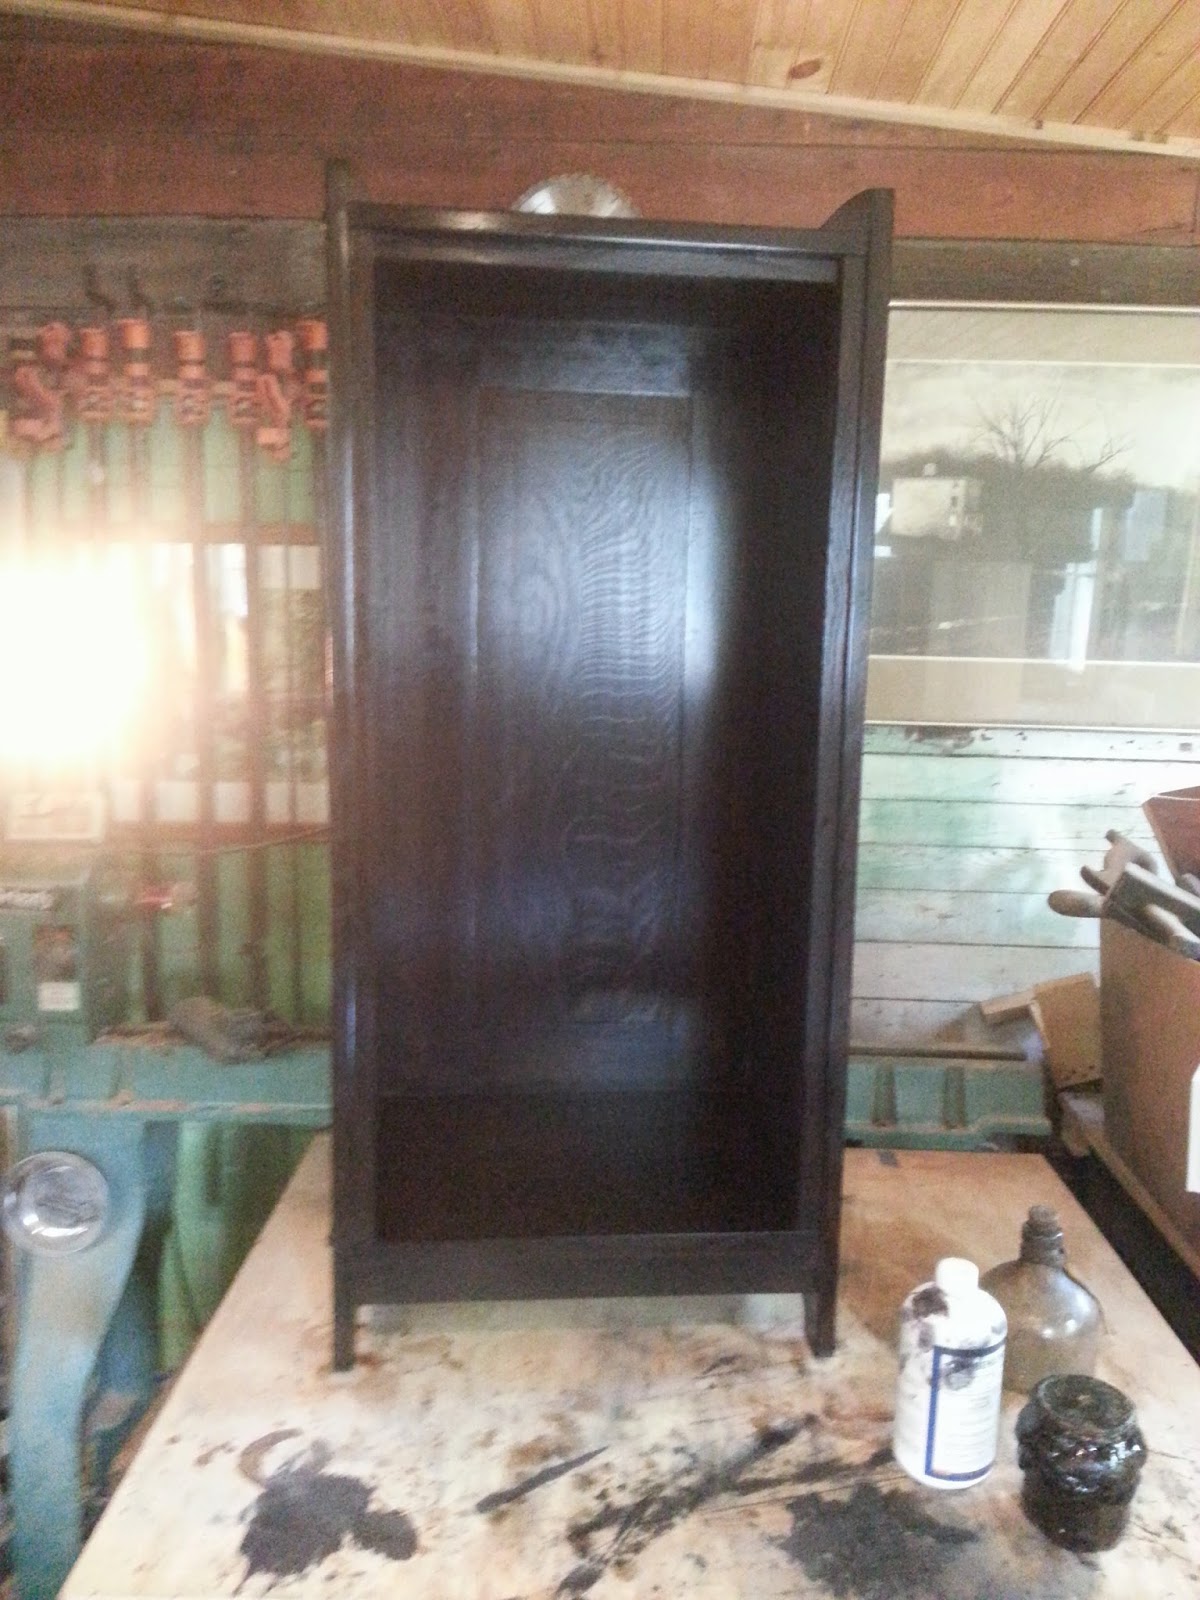
The stain I used for the cabinet was Jet Black ultra penetrating stain. I put it on pretty liberally , but not so much as to completely obscure the wood. The result was that the brown tones of the oak beneath came through and gave the case a very dark brown appearance.


After the stain had dried, I applied a shellac finish. Because of the streaky nature of paste wax, I did not use it on this cabinet, but instead rubbed the finish with a buffers polish as a final treatment. These next photos show the case during the finishing process.
The little strips seen in this photo are the pieces used to hold the glass panels in place. They were later cut to fit when the glass was installed.


The hardware was a traditional Stickley style "V" pull handle with an escutcheon. Another piece the customer had used the brass key seen below. I am not sure if that is an original Stickley key or not, but I found one on Ebay and I fit it to the lock.

Completed, the music cabinet surrounded by the mess created by its construction!

The following photos show the completed cabinet with the glass panels installed and hardware in place. I have found that when I get the opportunity to build a reproduction, that I really enjoy it. Likewise, when I get the chance to build with  oak, I find the process very satisfying. This project combined the two and was very rewarding for me and I would jump at the chance to do it again!


Custom Altar (2014)

$
0
0
The Completed Altar
There is a story told of a woodcarver commissioned to carve a large carving for a church in Europe. the carving was vast and reached up to the highest parts of the church. One day, a priest saw the carver near the top working intensely on a part of the carving that was completely obscured from view when seen from the floor. The priest was curious and decided to scale the scaffolding to see what this carver was doing. When the priest finally reached the top, he could see that the carver was carving exquisite detail into the face of an angel, that no one would ever be able to see. The priest asked the carver why he was spending so much time and effort on this detail that would remain unseen once the scaffolding was removed. The carver's reply to the question was " Because God knows it is there."

While I am by no means known for my exquisite carving of angels, This story has been rattling around in my head for the past few weeks. The reason for this is that I was asked to build an altar for a Greek Orthodox Church in Reston, Virginia. The church furnished photos of the altar they had in mind as well as the dimensions that were needed so that they could use the vestments from their old altar. I was told that once the altar was delivered it would be consecrated and then covered by these vestments. Once the vestments were on they would cover the altar completely and rarely by taken off. With this in mind, the question in my mind was how much time I should and effort should I go through to make this altar a beautiful thing to behold? Using sound joinery techniques and solid, strong timber were a must for the structural integrity and function of the piece, but beyond that, how beautiful should it be if it will be forever covered? 

The decision was really not mine to make at first, and I offered several wood choices to the church, of which walnut was decided on as the wood to be used. Walnut is a naturally beautiful wood and because of this choice, I new that I would be making something fine. But in addition to this in the back of my head, I kept telling myself the story of the wood carver. Of course this should be a thing of beauty. God will most certainly know it is there!

With this in mind I furnished drawings based on the photos the church had presented to me. The altar was completely rectilinear in form, and followed traditional orthodox designs that go back hundreds of years. Below are the initial drawings of the altar rendered in Sketchup.


One change that was made later that is not seen in the drawings is the inclusion of a reliquary, a vessel used to house a relic which was inlayed into the top of the altar. The design and creation of the reliquary is detailed later in the post.

Once the wood was selected, it was milled to the overall dimensions necessary. Below is a photo of the milled walnut used for the altar.
I started with the base and cut all of the tenons using techniques on the table saw which I have detailed in other recent posts. Below is a photo of all of the stretchers and apron material with the tenons cut.
To cross cut the legs, which were 38 inches long, I modified my cross cut gauge to accommodate the long boards. This was done by attaching a long board used to support the legs while the cuts were made. The gauge is seen below with the board attached. The following photo shows one of the legs being cross cut. I also clamped a stop block on the end so all of the legs would be cut to the same length. 

After the legs were cut to length, The next step was to cut all of the mortises into the legs to receive the tenoned aprons and stretchers. For this I utilized my mortising machine, which allowed this work to be done quickly and accurately. Below is a photo of one of the legs on the bed of the machine followed by a second photo showing one of the cut mortises.

After all of the mortises were cut, I test fit the legs and stretchers to make sure everything was accurate and square.

When I went to the sawmill to select boards for the top, I was thinking that if I was able to get three wide boards for the top, that would be good and I would be lucky. Most likely I would have to settle for four boards.I asked the sawyer to show me some boards that would allow for this. Almost as an afterthought, he pulled out two natural edge slabs that were bookmatched. I saw these boards with curly flowing grain and I said " That is the top!" I measured and found that the boards were more than adequate for the dimensions I needed. Below is a photo of the boards as I saw them at the sawmill.
Once back in the shop, I needed to make these boards square and to the right dimensions. after a little wrangling, I got the boards where I needed them to be. Here are two photos showing the boards before and after dimensioning.

When joined, the boards had great flow and seemed to be one board, as seen below.
This next photo shows the top being glued together.
The last piece of the altar that needed to be made were two cross stretchers that would intersect in the middle making a cross shape. the joinery at the intersection was lapped and below is a photo of me cutting to the line scribed where the two boards intersected.
A detail of the finished joinery is seen in the next photo. This is followed by a photo of the base of the altar being glued.

As I was getting ready to finish the altar, the church asked if I would be willing to add the reliquary mentioned above to the piece. I came up with a plan that involved adding a bit to the center of the top on the underside of the top to house the reliquary, as seen below.
For the reliquary itself, The inspiration came from turned boxes I used to make. A locust box made in a similar fashion can be seen by scrolling down in this post from 2009:

http://johnmarkpower.blogspot.com/2009/10/custom-items-for-christmas.html

The basic idea is to turn the lid and base for the cylindrical box from one piece of wood. By using a narrow parting tool, the grain seems to flow from the base to the top. This effect is seen from the side of the box and in this instance would be totally unseen because the box would be inlayed into the top of the altar so that the top of the box was flush with the top of the altar. even though the continuous grain effect was lost to the beholder, I still liked the idea of a turned vessel for this application and decided to go with my idea. Here is how I did it:

I started with a discarded cut off from one of the legs, which I cut into a two and a half inch cube. I then mounted the cube between centers on the lathe and turned it to a cylinder. The diameter of this cylinder was dictated by the hole saw I would later use to cut a hole in the center of the top. To test the diameter for a good fit, I cut a hole in a scrap piece of wood and used it to fit the cylinder. Below is a photo of the square blank and then the turned cylinder.

The next step was to turn two tenons on either end of the cylinder. These tenons would allow me to grip the cylinder using a chuck from either end. Using a regular parting tool, I then cut into the cylinder about a third of the way in from one side. This gave me a visual understanding of the top and the base. This also created a lip for the top to fit into the base later. This stage can be seen below.
Using a very narrow parting tool, I then separated the top from the base, as seen below.

With the chuck mounted on the lathe,  I inserted the top in the chuck and refined it. Once I felt it looked good, I dismounted it from the chuck and used the lip I had created to hold the top so that the tenon on the end could be parted off. This can be seen in the next two photos.

Once the top was completed, I then put the base in the chuck and hollowed out the inside of the vessel. Where the lip on the top would fit into the base, I used extra care to make sure it was a good fit. This required me to periodically stop the lathe and fit the top until it was just right. The next two photos show me fitting the top. Note how in the first photo the grain flows from the top to the base.

After the hollowing was completed I turned the base around and expanded the jaws of the chuck into the inside of the vessel, until the jaws held the vessel tightly. I then parted off the tenon at the bottom of the base, as seen below.

These next photos show the completed cylindrical box. The third photo down shows the box fit into the scrap piece I cut a hole in.


The next step was to cut a hole in the top of the altar in the center. after locating the center I used a hole saw to make my cut, as seen in the next two photos.

With the cylindrical box fully inserted, the top surface was flush with the top of the altar. A knife inserted around the perimeter loosens the top enough to remove it. The base was glued in place and became part of the altar.
This photo shows the completed altar. I lightly stained the altar to make the walnut look more consistent. The stain also made the walnut "pop" . The following photo shows the altar after staining.

These next two photos show the altar during the finishing process. This one detailing the top shows the magnificent grain in the two bookmatched boards.

The following photos show the completed altar, some with the lid of the reliquary in place and others with it removed. I was pleased with the results and felt that I had satisfied my desire to make this altar a thing of beauty that would serve the religious community it was made for for many years. I hope that I am right!

Thanks goes to Rick Herbine of Herbine hardwoods (http://www.herbinehardwood.com/) for the beautiful timber with the exception of the legs, which came from my friend Brad Chandler.


Cedar Lawn: Late Classical Bureau (Ca. 1820)

$
0
0

The Completed Bureau

This blog post concerns a piece I recently restored for an estate in Jefferson County, West Virginia called Cedar Lawn. If you are interested in viewing other pieces restored for this house, you can click on the label to the left that says "Cedar Lawn".
The piece in question is a bit of an oddity. It has all of the lines and construction details of a sideboard, but when the bottom doors are opened, they reveal an inner cabinet built in to the larger cabinet that houses a series of drawers. In addition, the two drawers above the drawers open to reveal a mirror (originally two, one in each drawer) that folds out and is adjustable. Behind the mirror are three little drawers built into the larger drawer. In front of the mirror are trays and one removable tray (again, there  were originally two trays, one for each drawer). It is as if someone walked into a cabinet shop and said, " I like that sideboard over there you are working on. Is there any way we can make it into a dresser/ dressing table?" 
In fact, something like this is what likely happened. If you look at the price books distributed in the early 19th century ( for an example click here: https://archive.org/details/cabinetmakerslo00unkngoog ) you will see that a piece of furniture was sold in its basic form. From there you could pick and choose features that suited your needs and the price would be raised accordingly. This cabinet was probably started with one idea in mind, and then customized to fit the needs of the particular customer who bought it. The inclusion of the separate inner cabinet that housed the drawers, held in place with screws, and finished with some molding around the edges, would suggest this. It would be easy to remove or install this inner cabinet, where, if the piece were intended originally to be used as a dresser, the drawer framework would be integral to the cabinet.

At least, this is one theory, and there is probably some validity to it. That being said, the early 19th century was a time of innovation and playing with forms. Below is a broadside showing the wares of Joseph Meeks & Sons, a prominent cabinet making firm from New York and competitors of Duncan Phyfe's cabinet making firm (not to mention the firm that built the bureau in question).

At first glance one can see the variety of pieces offered by Meeks & Sons, in the latest styles and fashions. What caught my eye is the piece second row from the bottom and to the far right. It is not visible in the image above, but the listing describes this item as a bureau. Bureau is one of those lovely terms in furniture that has a loose meaning. It can either refer to a desk or a dresser. If this were a desk, it was probably of the same kind as what we refer to as a butler's desk. If it were a dresser that "Bureau" was referring to in this ad, the layout would have been similar to the piece I worked on.

Because of this ambiguity, I thought that bureau would be a perfect way of describing this piece, which seems to be a mix of two forms. What I do know about the piece through inspection, was that it was made in a city center on the east coast some time in the first two decades of the 19th century. The piece could be Baltimore, but I am inclined to think it came from Philadelphia or New York. The inclusion of a white marble top might suggest one of these places because marble was used throughout the east coast on fine pieces, constructed near ports, during this time. The primary wood used in the piece is exquisite mahogany, both in veneer and solid form. The knobs are made of rosewood. The secondary woods used in the piece are poplar and pine. All of the timbers used were selected for their beauty as well as their stability, and as a result, two hundred years later there was minimal cracking and loose veneer/ joinery. This was a well made piece made by professional craftsman who did exquisite work. It is my belief that this piece was made by a cabinet making firm such as Meeks or Phyfe, somewhere on the east coast, and not by a sole cabinetmaker.

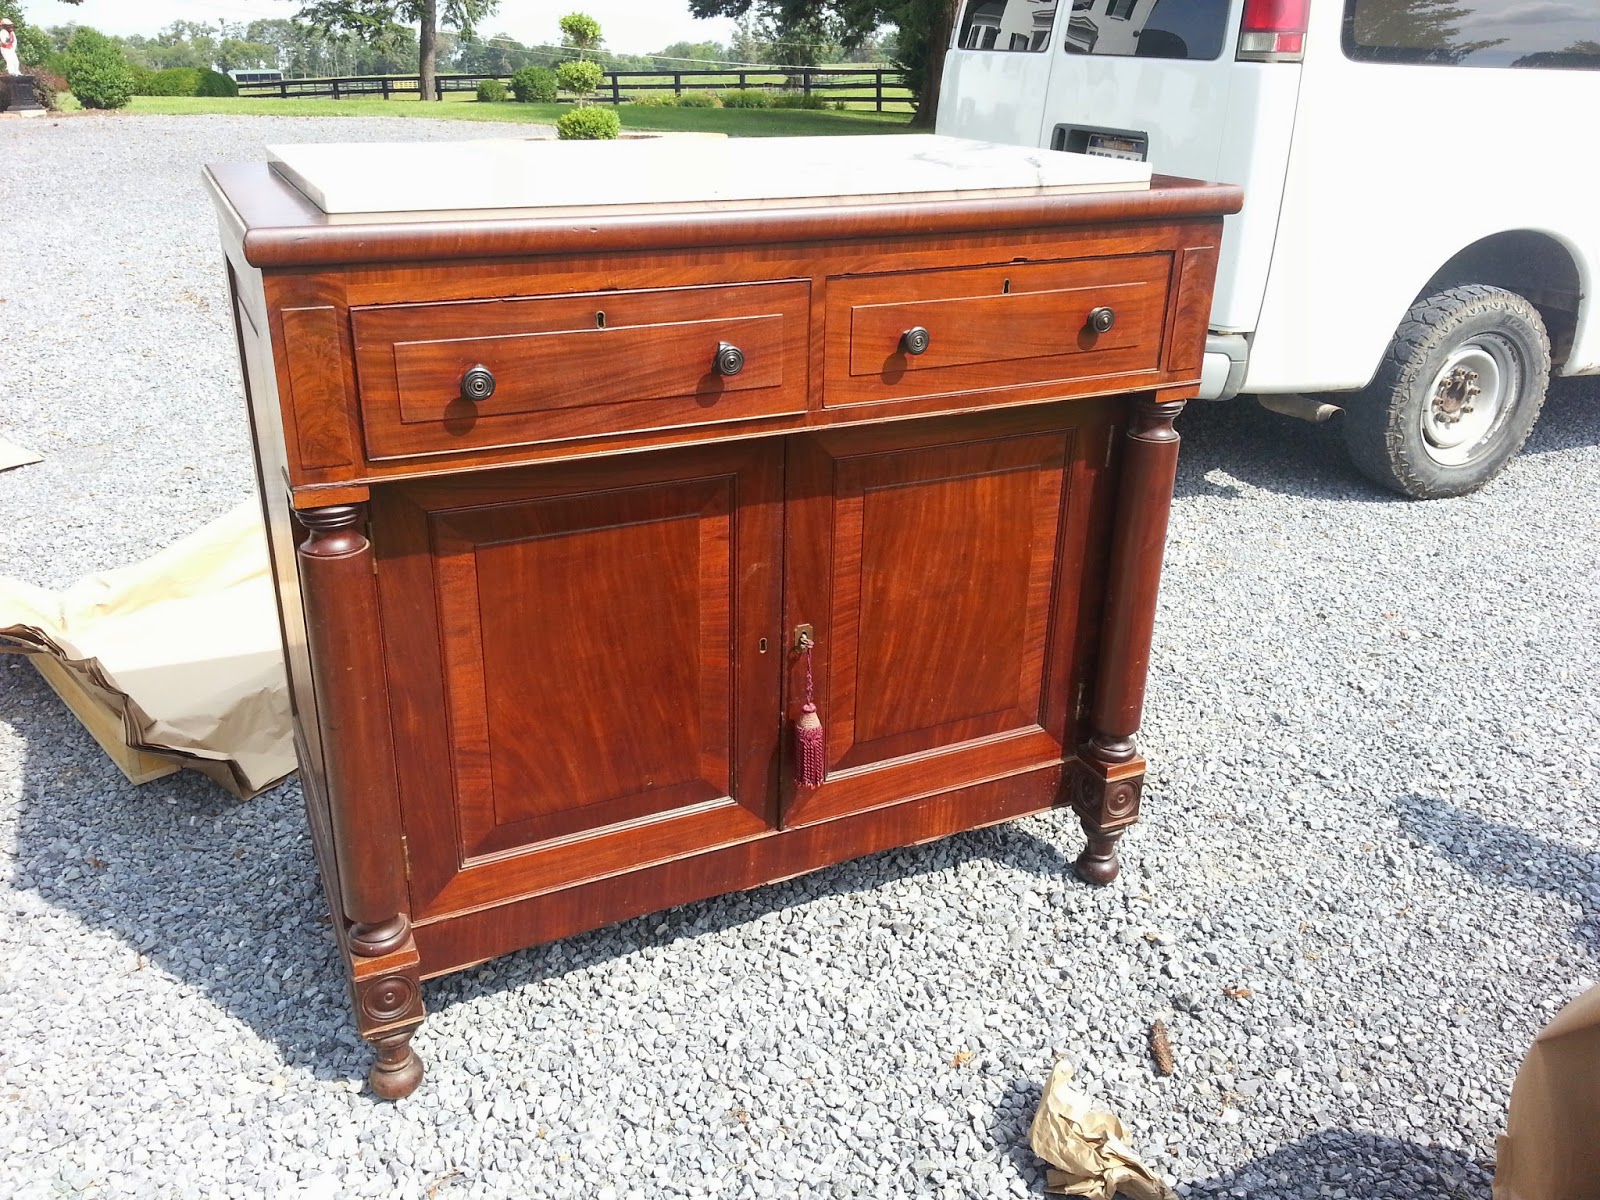
Even with such superior workmanship at hand, time took it's toll on this piece, and the damage was plentiful when I first saw it. Below is a photo of the piece as it came to me.
One of the big problems was that the rosewood knobs had broken off in places and one was missing entirely. Below is a photo of one such knob.
An interesting detail of construction was how the knobs were attached to the drawer fronts. The knob had an integral tenon that fit into a corresponding hole in the drawer front. Then a hole was drilled through the top edge of the drawer front straight down to and through the knob's tenon at a perpendicular angle to the knob. A long oak or ash dowel was then inserted in this hole locking the knobs in place. This detail is seen below where the top of the dowel is visible on the top edge of the drawer front.
This made removing the knobs challenging, but in the end we were able to remove them so they could be repaired, as seen in the photos below.
A nice block of rosewood was procured to repair the broken knobs and turn the new knob, as seen below.
Before getting into the repair of the knobs, I thought it might be interesting to detail how the knobs were made in the first place. Since I needed to make one, I took photos along the way.

The knobs were started between centers on the lathe with the grain running parallel to the bed of the lathe (as opposed to face grain knobs). I started with a square blank that fit the dimensions and turned it to a cylinder.

I next tuned the tenon on one end that would ultimately be inserted into the drawer front, as seen below.
The next step was to remove the blank from the between the centers and mount it in a chuck, so that the tenon was held while the other side could be worked.
From there the details of the knob were turned.

The finished product was stained and finished while still on the lathe.
After that, I turned to the repair of the original knobs. The first was missing the back side of the knob, where it meets the face of the drawer. The blank I  made to patch this had a hole drilled in it so I could slip it over the tenon and glue it to the knob.
This bank was then cut into an octagonal shape to reduce turning time, and the proper amount was cut on the band saw.
The knob itself was turned to match the diameter of the blank and the blank was glued to the knob as seen in the next two photos.

Once the glue had dried, I mounted the knob on the lathe and turned the blank to the appropriate profile, as seen in the next four photos.


This next knob had a similar issue, and it also needed part of the front of the knob turned. The repairs are seen in the next two photos.

This one was my favorite! Much of the knob was broken on the back side and a large blank was glued to the knob.
When the lathe was turned on, the silhouette of the original knob could be seen "through"  the spinning blank, as seen in the next photo.
By watching my tool and looking at the original profile, I was able to turn down to that original profile. This method was used throughout this process with the knobs and gave very accurate results.
Moving on to the case, there was a great deal of molding that was missing from the case. Most of this was what is called Astragal molding and consists of two flats with a hump in between them when viewed in cross section. To make replacement molding, I made what is called a scratch stock, which is a piece of metal (a section of a saw blade from a wood-mizer) with the profile of the molding cut into the metal. the metal is housed in an "L" shape holder and a bolt is run through the wood to compress the wood around the  metal and hold it in place. The shop made tool is seen below.
In the bow of the "L" shape is the protruding metal and cut into it is the hump part of the molding.
Once I got a blank to the proper thickness I clamped it to my joiner, as seen below.

By dragging the scratch stock over the wood at a perpendicular angle, I was able to produce the molding, as seen below. Once I was satisfied with the molding I would rip it from the stock on the table saw and with a bit of refinement I had replacement molding.
The second profile was seen around the inside panels of the doors. This was a bit more complicated and the profile can be seen below cut into the metal.
the same process was used to make the molding, as seen below.
The finished patch of molding, in the door and ready for finish and touch up.
this next piece shows the piece during the cleaning process. The yellowish haze on the drawer fronts is dried wax that had been separated by mineral spirits.
Some of the inner trays needed some repairs, as seen in the photos below.


One interesting repair was performed by Jesse, who works with me. The columns had deep dents in them from things banging against them through the years. One of the columns is seen below with the dents visible.
By applying steam to the dents the wood moved back out to where it had originally been. The steam was applied by using an iron and a wet rag. The watery rag was placed over the damaged area and the iron applied to that. after awhile the dents were nearly gone, as seen in the next photo.
The two upper drawers both had damage where the thrown locks had smashed into the case front breaking off bits of wood in that area. Below are some of Jesse's patches on the damaged case.


One of the interior draws needed a patch on the corner, and Jesse provided the work on this as well. The results are seen below.

these next few photos show various parts of the dresser during the finishing process.


These last photos show the completed bureau.


A Fantasy Vanity (Ca.1940)

$
0
0
The Completed Vanity


 Sometimes I am asked to do something out of the ordinary, something that pushes the limits a bit. Something that takes the same amount of concentration and steady hand to produce, but with very different results! This vanity was such a piece, and it was a lot of fun to refinish. 

The piece itself was from a larger bedroom set and was made sometime in the 20th century, I am guessing the 1940's but it could easily be earlier or later. The vanity was a factory made piece and had exquisite veneers. It seemed that almost every surface was covered with a different veneer, which made the piece lend itself to what the owner had in mind, which was to transform it into something out of a fairy tale or fantasy. This was achieved by using a variety of stains, mostly of solid colors like orange, yellow, blue and green. A bold change from the wood tones I usually work with like light walnut and light red mahogany. The result was a fantastic piece that accomplished its goal in every way. My feelings were confirmed the other day when a friend came into my shop, saw this vanity, and said " Wow, that is straight out of Alice in Wonderland!" 

Below are a few shots of the repairs meant mostly to show the piece before it was transformed.


 These next few photos are of the finished piece. the light carving incised into the drawers had a gold leaf paint brushed into them which really set the piece off. This was a fun project and the customer was happy with the results, which made me happy!


Late Classical Mahogany Rocker (ca.1840)

$
0
0
The Completed Rocker
What is good mahogany? What do people mean when they say "This is good mahogany, or that piece has fine mahogany in it"?

The answer  to these questions could fill up a book, in fact it did. Mahogany: The Costs of Luxury in Early America by Jennifer L. Anderson traces the United States love of this wood through the 18th century and well into the 19th. It is a comprehensive look at how we used and abused this wood to the point where it is in some cases in a state of commercial extinction. If you have any interest in the subject, I highly recommend this book.

In and attempt to answer the question a little more quickly, The two main types of mahogany used in the production of fine furniture are Honduran Mahogany (swietenia macrophylla) and West Indies Mahogany (swietenia mahogani) Both are fine woods and can be polished to a nice shine, but latter is what people refer to as good mahogany.
Swietenia Mahogani is found throughout the Caribbean region and when originally harvested, differences in the micro climates where the timbers grew gave the wood different characteristics, giving rise to many different names, including Haitian mahogany, Cuban mahogany, Santo Domingo mahogany, Jamaican mahogany etc. While all of these woods had different characteristics they were all swietenia mahogani. Distinguishing what wood came from where these days is difficult so the name of West Indies mahogany has been adopted when referring to swietenia mahogani.

 Swietenia macrophylla, or Honduran Mahogany is found in a much larger geographical area including much of Central America. The trees are bigger and produce quality lumber that is still being produced today. 

In the 18th and 19th century, it was common for cabinetmakers to use both woods in a single piece of furniture, usually reserving the West Indies mahogany for the showier places like drawer fronts, while the sides of a case for a chest of drawers might be made of Honduran Mahogany. Each piece of furniture was different, but when it was available, West Indies mahogany was generally preferred.

Today, Honduran Mahogany is the only true mahogany commercially available. The only West Indies mahogany available is old stock or pieces reclaimed from furniture and architectural pieces. When possible, I use reclaimed West Indies mahogany to make repairs, but when the repairs are substantial, I use Honduran and apply stain and touch up to blend the repairs into the existing wood.

In the case of the rocking chair, the majority of the chair was made from exquisite West Indies mahogany. One of the rockers was broken and in need of repair, involving the use of bridging patches to span a very broken component. 

In order to make room for the patch, I need to remove some of the wood around the broken area. I used a router to do this. Even though it is a small amount of wood, I always lament the fact that I am pulverizing a wood that is no longer available. I try to keep these repairs to a minimum and only do what is necessary.

When I routed the wood, I was left with a pile of shavings of West Indies mahogany. Below is a photo of those shavings next to a piece of Honduran mahogany used for patching.

The first thing to notice is the color difference, The West Indies mahogany being a rich dark color, while the natural Honduran mahogany is much lighter. If the shavings were one piece of wood, you would also see that the grain is much, much tighter and the wood resembles cherry more than Honduran mahogany in some cases. The result is a wood with unbelievable natural color and and compact grain which lends itself to a high polish.

Below is a photo of the completed repair I spoke of above. You can clearly see the color difference here.
As far as the rocker is concerned, Once the repairs were made I cleaned the existing finish and polished it with Dewaxed Shellac. It did not take many coats to bring the finish to a high polish. All of the repairs were touched up and the chair was eventually waxed. The result of the restoration showed off the beauty of this wood. No stain was used on the rocker originally  and the only staining I did was to blend in the areas I touched up, as seen in the photo below of the same repaired area.

Below are a few photos of the the restored finish. The embroidered upholstery was old but not original. This piece is a stunning example of  a late classical rocker made probably in a city center like New York or Philadelphia. To me, the most stunning aspect was the fine mahogany used to execute the design of this chair. A most remarkable wood the likes of which we will never see again!


X- Frame, or Campeche Chair (ca.1820)

$
0
0

The completed Chair
Strictly speaking, this is not a Campeche chair. The Campeche chair is a type of chair popular in the plantations of the south and was made in Mexico and in the southern United States in the 18th and early 19th century. The name comes from Campeche, Mexico, a state bordering Yucatan in southeast Mexico. The form is believed to have originated there.

While these chairs were being made there, Europe saw the emergence of what the English refer to as a X-Frame Chair. This name comes from the X shaped base of the chair that can be seen from the side. The X-frame design is a twist on The Curule chair, an form first seen in Ancient Rome and later to reemerge as part of the neoclassical period of European furniture history. In the Curule chair, the X-Frame that makes its design is seen from the front of the chair.

The design for the X-Frame chair is so similar to it's Central American cousin, that all of these chairs are commonly referred to as Campeche chairs. What ever you want to call it, this chair is very rare and of all of the examples I looked at in researching this post, it is the finest.

The primary wood used in the frame is West Indies mahogany (see my last post) and the entire frame is inlayed with sand-shaded satinwood. The curvilinear design is very much in keeping with the neoclassical ascetic (for comparison, see my last post) and the workmanship throughout was outstanding.

The joinery on one of the legs as well as one of the arms had loosened and I cleaned and glued the joinery in my shop. Other then that, I cleaned and waxed the existing finish on the chair. Because of the work done on the chair, I chose not to photograph the repairs, but chose to focus instead on the completed photos. This is quite a rare chair and I wonder if I will ever see another like it come through my shop!


National Oak Roll Top Desk (1917)

$
0
0
The Completed desk
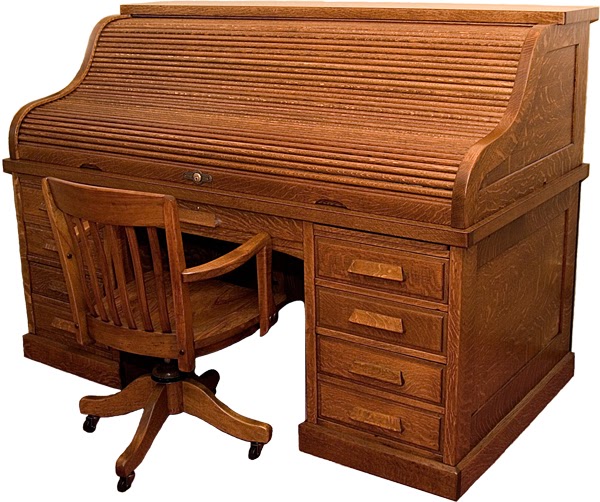
One of our recent restoration projects was an oak roll top desk made in 1917 by National Desks. Presumably, this is the same company as the National Furniture Company of Mt. Airy, N.C. I found no reference to a National Desk Company but when I researched National Furniture Company Roll Top Desks I found several examples of similar roll top desks. In each case the general design was identical but the details like the hardware and the arrangement of the cubbies were different. Without being exactly sure of the manufacturer, I am certain of the date of manufacture and the subsequent retailer. 

The desk was labeled in different places in different ways. The most prominent label is a plate on the interior one of the drawers. The label said Clark & Gibby, NY. At first I thought that this was the manufacturer but we later found stamped on the top of a drawer front "National Desks" as seen below:

I believe that National Desks, or more likely the National Furniture Company, was the manufacturer and Clark and Gibby was the retailer. After removing the interior cubbies to make repairs, we found this label:

The label shows the style and model number,indicating that a specific model had options that would be contained in a particular style. Also in the lower left hand corner is a completion date of 1917. This would have been used in the manufacturing process and not meant to be seen by the public, but it is always nice to find something like this because it pinpoints a date.

The roll top desk as a form developed in the second half of the 19th century. It's immediate predecessor was the cylinder desk which worked the same way but had a solid quarter cylinder for a lid. Here is a photo of one of these I restored and the links to those posts concerning its restoration:


As you can see, the"cylinder" part was solid and veneered with walnut. The roll top desk differed in that the lid was comprised of many half round slats adhered to a sheet of canvas. These slats would move in a a track in a similar fashion as the solid lid, but because they were separate, this made them more flexible. This allowed desk lids to take shapes or follow tracks that did not move in a fixed arc. What followed were lids with ogee profiles (probably the most famous) like this one:


 As the from developed there were a lot of designs, but in the beginning of the 20th century, a larger desk came on the market with a roll top that followed a single curve. At the time, it was labeled a modern roll top desk. The desk I worked on falls into this category. Below are a few photos from around 1917 showing the large "modern" roll top desk in use:


The desk had a lot of wear and tear and also many mechanical issues. The finish was in a restorable condition so we concentrated first on the repairs. 

The veneer along the sides had loosened and then chipped away over time leaving this:


New oak veneer patches were cut to patch the missing portions as seen below:


The case was generally loose and needed to be tightened. That process can be seen in the next photo. Besides that here was lost of "nuts and bolts" repairs, like replacing missing stop blocks, building up drawer bottoms, stabilizing interior runners, etc.


After all of the repairs were made, the finish was cleaned and restored using shellac. The finish was faded in several places so stained the desk selectively, as well as touching up the patches. I also made keys for the locks and generally made sure everything was working well. The completed roll top desk can be seen in the photos below.


Arts and Crafts Oak China Cabinet (ca. 1920)

$
0
0

The Completed  China Cabinet
Once and a while we get a restoration job where the piece we are working on really sees a major transformation. Pieces that are painted usually fall into this category. 

A customer asked me to restore an heirloom china cabinet that was a piece made in the Arts and Crafts style in America sometime in the early part of the 20th century. The piece was made from white oak and had some nice quarter sawn boards throughout the piece. While I would not label this piece "Arts and Crafts" in the strictest sense, the use of oak, and the over all lines (minus the bandsawn feet and applied corbels) reflect the American Arts and Craft aesthetic. Of particular note is how the mating surfaces are never flush. for example where the side front glass frame meets the side glass frame, the frame overlaps about 1/16 of an inch. The designers of this did this intentionally to create a very simplistic sense of depth to the surfaces. For more on this take a look at the music cabinet I made in 2014:

http://johnmarkpower.blogspot.com/2014/08/stickley-music-cabinet-2014.html

At any rate, this piece loosely falls into the Arts and Crafts category, so that is where I am placing it!

The condition of the piece when it came into the shop was that the entire piece had been painted, every joint in the piece was loose, It was missing its lock, escutcheon, and key, and the back had been pieced together at some point with newer material. Here is a "before" photo of the cabinet:

 
Obviously, the first thing to do was to remove the glass and then the paint and the finish below the paint, leaving the bare wood. After this was accomplished the cabinet looked like this:
The back and the quarter round were discarded and new material was installed in its place, but first the loose joinery needed to addressed. Below are the components that make up the cabinet during the dismantling period, everything was labeled so I knew how to put it back together.

While the cabinet was apart, several panels (like the bottom and the shelves) had separated along the joined boards. they were repaired and glued, as seen below.
These next two photos show the fixed frames that make up the sides and the door being glued together.

After the glue had dried on the side frames, the customer and I decided to introduce an adjustable shelf system to the piece. The brackets which had held the shelves originally had been fixed. To accomplish this, I used a shelf drilling jig to drill the holes on the stiles of the side frames as seen in the next three photos.


Once all of the frames were assembled, the rest of the piece was assembled with new glue. Before I assembled all of the individual parts, I sanded everything which was easier than sanding the piece when it was together. Below is are photos of the rebuilt cabinet and the shelves before staining.

I used a blend of a light walnut and extra dark walnut stain to simulate the look of oak fumed with ammonia. This fuming was the way in which Arts and Crafts pieces obtained there color, although I have run into plenty of pieces that were stained instead of fuming.


These next few photos show the completed piece with the glass installed.


Here is a detail of the key and new escutcheon I installed (the lock is on the inside of the door).

This photo shows one of the two corbels. They were made of a few boards stacked side by side, which were  face glued and band sawn to the curved profile. The band sawn edge was then sanded and veneered with quartersawn oak. The feet were also made this way.

Here are a few more photos taken outside (with a bit of snow in the foreground).


Pennsylvania Chippendale Tall Chest ( ca.1790)

$
0
0
 
The Completed Chest

I recently got an interesting piece into the shop. I really did not do that much to it, but I thought it had a lot of different points of interest that were worth sharing. The piece is what is referred to as a tall chest and was probably made in Pennsylvania in the last quarter of the 18th century. Chests like these were made in that region at this time and several characteristics led me to recognize it as a Pennsylvania piece. 

The chest consisted of three short drawers at the top. Below was a set of two short drawers. Below these were four long drawers. All of the drawer fronts graduated nicely and consistently from top to bottom. I make note of the drawer configuration because it is seen in other contemporary tall chests from Pennsylvania. Walnut was used as the primary wood and Oak and pine were used as secondary woods. There was the presence of Poplar in one drawer and in the back, but I feel that in both instances the wood was used in a repair setting and was not original to the piece. Poplar is not unheard of in Pennsylvania furniture, but the other two woods are often seen as secondary wood choices.

This piece has seen several alterations in its day. The feet would have originally been ogee bracket feet and evidence of the original feet was found on the piece. At some point these feet were replaced with taller cabriole legs that are more consistent with a high boy. These feet are not original, but were hand made and at some point attached to the chest. I suspect that the crown and base molding were also replaced at some point as well.

The other alteration to the piece was that at one point it was cut in half and reassembled. The cut must have been made poorly because there was a patch on either side of the case running front to back which was about 2 inches wide. I thought the case had been altered at some point or assembled from two pieces, but in the end, I think it was cut in half to get it in a room and reassembled in place. This was not uncommon as these pieces came down through generations and moved from house to house. Here is a link to an appraisal of a Pennsylvania tall chest on Antiques Roadshow that had a similar procedure done to it:


Below is a photo of the chest that I took when it entered my shop.

One of the things I was hired to do was to clean  the existing finish. To do this I needed to remove the hardware. I knew by looking at the piece that the hardware was not original. this was confirmed when it was removed.

Below is a photo of an escutcheon hole. The original escutcheon is seen inset in the drawer front. Around it is the shadow of a Chippendale style escutcheon plate that was on the piece.

When I removes the pulls I saw this ring around the post holes. This would have been made by the back plate for a rosette pull, which may have been the original pull on the piece.
One of the most interesting features of this chest was the presence of intact "Quaker" or "Spring" locks. Quaker locks were used in lieu of mechanical locks on the upper short drawers. The way that a Quaker lock works is that there is an access hole in the dust cover below the drawer that has the lock, large enough to put your finger in. One of  these holes in shown in the photo below.
Directly above the hole is a board nailed into a inclined recess on the drawer bottom. The board is flexible and can be pushed up. When it is in place, the end grain of the board pushes against the back side of the drawer divider, preventing the drawer from opening. when a finger pushes the board up towards the underside of the drawer bottom, the end grain of the board clears the drawer stretcher and the drawer opens. Basically, to open the drawer above, you need to access it by opening the drawer below. In theory, one could put one mechanical half mortice lock on the bottom drawer of a chest and lock the rest of the piece with Quaker locks. In this instance, the short drawers were locked with Quaker locks, while the four long drawers had mechanical locks.

Back in the day, The ability to lock your furniture was important, and often the only way of securing the contents. Mechanical locks were expensive and also a commodity that needed to be bought in a city center. These Quaker locks were and affordable and easy to manufacture lock that in this case saved the expense of five locks. Below are a few photos of the Quaker lock on the underside of one of the drawer bottoms.

The chest had sustained water damage on one side. The finish was not original to the piece so I removed it and replaced it with a new finish. Below are some photos of the water damage. It is seen as the light streak going down the case side. This was where the finish had peeled off of the case entirely.

As stated above, the case had been cut in two at some point. It was later patched as seen in the photos below.

To remove the finish from the side I taped off the molding as seen below.
I then removed the finish and sanded the surface lightly to remove any finish residue.
This next photo shows the case side with a few coats of shellac on it. It took several coats to match the sheen of the rest of the case.

Three of the four replaced feet were loose and needed to be tightened. The feet were attached to a board running front to back on either side of the case bottom. They were attached with beautiful dovetails that I cleaned and reglued in place. because the joinery was tight, I put the piece on its feet and let the weight of the case work as a clamp as the new glue set. Below are a few photos of the legs removed from the case.


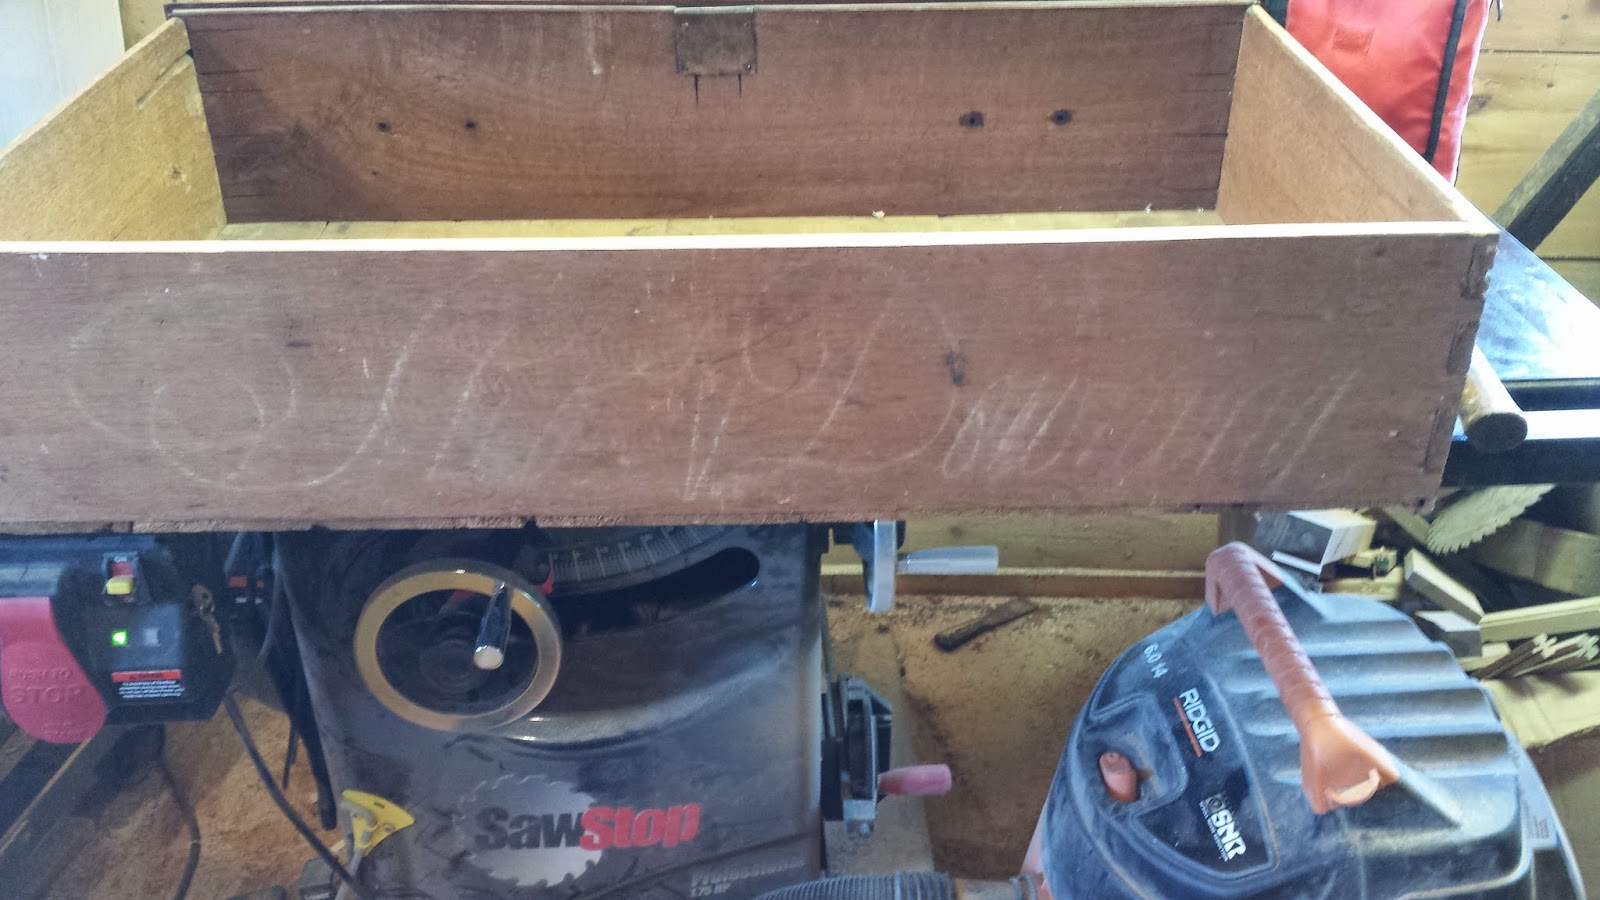
One of the nicest discoveries about this piece was the presence of a signature. It was boldly (and largely) written on the back of one of the long drawers in chalk. after looking at it for some time I believe it said "Tho. V Downing", although I believe the V was not meant to be part of the signature. The last name of Downing was the clearest part of the signature. The first name was a lot less clear. here are a few photos of the signature followed by a cropped photo that I manipulated and reversed to try to get the signature clearer.


In addition to the signature, there was a lot of math written out on the interior face of a back board. Pencil and Paper was a precious commodity in the 18th century. It was far cheaper to write on what was at hand.I find myself writing notes on scrap pieces of wood all of the time. While none of the math was legible, there was quite a bit of it. either it was the equations that worked out the dimensions of the chest, or maybe it was some accounting work! Whatever the reason was, it is always nice to see these kinds of things on a piece, as they give a small glimpse into the mind of the maker.

After the piece was cleaned and the one side brought up to speed with the rest of the case I polished and waxed the case and drawer fronts. I also waxed the interior runners so that the drawers would work smoothly. After that, the hardware was put back on but left unpolished and the chest was ready to take back to the customer.

Even with all of the alterations that took place over the years, this is a stunning piece of American craftsmanship and I was happy to be able to restore Mr. Downing's fine tall chest.

A Great Bow lathe Video

$
0
0
A friend sent me a video today I thought I would share. It is of a Moroccan wood turner using a very old style of lathe called a bow lathe. Essentially, The lathe is powered by a bow that has a string wrapped around the blank to be turned. One arm serves as the power source while the other holds the turning tool. The foot is used to control the cuts. This is all done in a seated position on the ground. This is a much different approach to turning than most of us are accustomed to and one that has always fascinated me. Watch how quickly and efficiently he turns this captive ring piece of jewelry in the video:


The video was originally uploaded here:

http://www.saddlebackleather.com/latest-news/March-Newsletter-2015?utm_source=Master+List&utm_campaign=228be7b05b-March_Newsletter_20153_24_2015&utm_medium=email&utm_term=0_066599646b-228be7b05b-142404397&mc_cid=228be7b05b&mc_eid=110f27faa7

Here are a few other photos and drawings of the bow lathe in action.


This is truly fascinating to watch and I felt like I had to share this!

Plastic Injection Molded Chair (2014)

$
0
0
The Completed Chair
The Plastic Chair. It is everywhere. Gracing the lawns of America. Trainspotters in Sandy Hook, Maryland keep their soot covered chairs close to the tracks. Every Metro stop in Potomac, Maryland has a plastic courtesy chair probably placed by a good Samaritan. New, old, clean, dirty, broken, whole, they are everywhere.

Tracing the history of this ubiquitous piece of furniture in the minds of some goes back to the mid 20th century. Going back further two distinct ideas were formed that later coalesced. The first was the formed chair.

This innovation can be seen as far back as the mid 19th century, in the furniture of John Henry Belter of New York, NY. Belter created the backs for his chairs by laminating veneers of Rosewood over a shaped form. after the glue had set, the laminations retained the form. Belter would also turn the orientation of the laminations to give the backs strength, In essence creating the first plywood (although out of much fancier woods than used today.)

Below is an example of the formed back of a Belter chair:

Here is a link to a Belter chair I worked on a few years ago:

http://johnmarkpower.blogspot.com/2012/10/john-henry-belter-rosalie-pattern.html

The other idea that ultimately lead to the plastic chair is the chair that can easily be mass produced. One of the first prominent attempts at this was the chair made by Michael Thonet. His bentwood chair relied on steam bending components over a form to create the lines and structure of the chair. Every part of this chair was shaped over a form to create the shape that has become Iconic. Below is an example of Thonet's Design.


On to the 20th Century, Charles Eames worked with laminations of Rosewood and Walnut to create what is now known as the Eames chair, taking a page from the earlier work of Belter. Also, Eames and other designers were working with plastics to create a chair that could be comfortable and mass produced. An example of Eames plastic chair is seen below.
 This Example, by Eero Saarinen, shows a plastic chair throughout. This was probably reinforced with metal in the wine stem base.
 The Danish designer, Verner Panton created this chair using only plastic and the process of injection molded chair.
 In July of 2004,


The chair was very loose and needed to be tightened. Because of its shape, several different clamps needed to be used.

After the clamps were removed, The chair was cleaned with a little water, and was ready for delivery. Below are a few photos of the restored chair in all of its glory.


In researching this article, I found the following photo on Facebook. This one goes out to all the Bostonian readers of the blog:
I hope you have enjoyed this post about the plastic chair and all of its various influences and the next time you sit in yours, think upon the many hands and minds that worked towards that fine piece of furniture.

Happy April Fools Day from all of us at John Mark Power Antiques Restoration!


English Dressing Table (ca. 1760)

$
0
0
The Completed Dressing Table

Introduction.

As a restorer of antique furniture, I see a lot of different pieces in my shop. Each piece requires specific repairs and offers up new challenges. That being said, there is a usual process that I follow when I restore a piece that ensures that the piece will be restored completely and in an effective way.

In the example of an 18thcentury English dressing table, I will describe the general process of restoring a piece and also some specific repairs made to this piece. A quick note on terminology. I use the word “restoration” to describe the process of my work. What I mean by this is the restoration of the original or existing finish. I do not use the word refinishing unless that is something that I am actually doing. Paired with restoration is conservation, which I describe as retaining and stabilizing as much of the original material of the piece as possible, and when repairs are made, I use materials consistent with the age and condition of the piece. I will explain this further as I go along, but basically my goal is to restore a piece to the condition of a well-cared-for antique, displaying the use and wear of the years it has been around.

History

The dressing table I restored was made sometime in the second half of the 18thcentury, in England. The design elements of the piece as well as some of the construction choices point towards this time. Design and construction,as well as identification of the woods used on the secondary surfaces, also help to determine where the piece was made.

The dressing table form came into existence sometime during the second half of the 17thcentury in England and examples can be seen as early as  the William and Mary and Queen Anne styles. In each case, The leg design was the drastic design change, first the trumpet-like turned legs of William and Mary, followed by the cabriole leg that has ,in part, come to define the Queen Anne style. By the time this dressing table was built, the cabriole leg was being replaced by a straight leg that was chamfered on the inside corner. In some examples, a bead can be seen on the outer corners of the leg running from top to bottom.This straight leg was in keeping with design trends of the later 18th century, during the period usually described as George III.

Besides the straight legs on this particular dressing table, the shaped aprons on the sides and the hardware used are consistent with the later half of the 18thcentury. One other important component is the use of mahogany as a primary wood. Mahogany came into widespread use in England after the 1720's and by the 1750's had completely replaced English walnut as the primary wood used in furniture construction. The use of this wood, coupled with the design characteristics mentioned above, help me to determine the age of the table.

One other important element to consider when dating English furniture is the orientation of the drawer bottoms. Prior to 1750, the drawer bottoms were oriented so that the grain ran from front to back. The bottoms were nailed to the bottom of the drawer sides and with no allowance for expansion and contraction, the bottoms would typically crack in various places. In the photo below, you can see the orientation of the drawer and the subsequent cracking which was later repaired.

Around 1750, English cabinetmakers began to run the drawer bottoms with the grain running side to side, nailing the bottoms only on the backside of the drawers. This allowed the board to move with the seasons and (hopefully) not crack. While this is a difficult way to determine age, the drawer construction of the dressing table shows the bottom boards running front to back, which might point towards a date closer to 1750.

Condition
When the dressing table came into my shop, The first thing I did was to look it over and figure out all of the repairs that needed to be done. The finish on the piece appeared to be original, or at least very old, and in good shape.
 The top and drawer dividers were veneered with mahogany over a pine secondary surface. Differing rates of expansion and contraction in the veneer and substrate, due to changes in humidity, caused the veneer to separate from the pine, and in the top, for the pine and the veneer to shrink together causing cracks in the surface.
 On the dividers, some of the loose veneer had fallen off and was lost, mostly around the bottom of the apron.

 One other bit of damage on the top can be seen in the photo below as a line running parallel to the edge about 3/4 of an inch in. This is known as telegraphing and is caused by the woods that make up the secondary surfaces shrinking at different rates, causing the "shadow" of the joinery to be seen through the veneer. This is a common characteristic of antique veneered pieces and shows the age of the piece, so I do not try to repair this, but look at it as an attribute.

Originality

While looking at the damage and coming up with a plan of attack on the repairs, I also keep an eye on the originality of the piece. Part of this is to help me determine if something needs to be replaced and also just out of curiosity and to get a better understanding of the piece when discussing it with the owner.

One of the big questions with this piece was whether the hardware was original or not. Coming up with a definitive answer to this question can be difficult, but several clues led me to believe that the hardware was quite old and in most likelihood, original.

The pulls and escutcheon plates were pierced and in a style that was consistent of the second half of the 18th century. The top drawer is seen with two pulls and one escutcheon plate below.
 When the hardware was removed, all of the individual components were also consistent with 18th century manufacture. The back plate was separate from the posts, the posts had hand cut threads cut into the post stock (no machine screw threaded in from the backside) and the nuts were square and irregular, suggesting they were made by hand. One other detail was that the back plates were beveled with a file on the back side on all of the pierced edges, casting a shadow when the back plate was against the drawer front. This gave the back plate visual depth and is something I have never seen on modern replacement hardware.
 On the drawer itself, a "shadow" is left where the back plate had been. This is caused by the wood on the drawer surface being exposed to sunlight, while the wood behind the back plate is not. Usually when other hardware was present, evidence of other shadows can be seen where that hardware had been. In this case, it appears that the current hardware was the only hardware on this piece.
 One the inside of the drawer, the presence of numerous holes for different hardware boring would suggest that the piece once had different hardware. On the dressing table,only two holes were present for each pull.

 One peculiarity with the lower center drawer front was that the hardware was too large for the drawer, so that the bottom edge of the hardware overlapped the cockbeading on the drawer front.


  One might be inclined to think that this would indicate that the hardware was replaced, but in looking at the piece as a whole, I found other evidence of "using what you have".

 The interior side of the top was an extremely distressed piece of wood that looked as though it had been re-purposed, or more likely, saved from the scrap pile and patched in order to make it work as a substrate. Wood was precious in the 18th century, as was the time it took to mill that lumber to usable stock. If a board that would never be seen had some defects in it, sometimes it was easier and more cost effective to use that board instead of finding and preparing a "clean" board. 


 Perhaps the same was true of the hardware. The cabinetmaker may have simply had that hardware on hand and decided to use it even though it overlapped one of  the drawer fronts. When the piece is viewed as a whole, it certainly does not detract visually, and in my mind, details like this add speculative interest to the piece and it's history.

Cleaning

Getting down to business, the first step in restoring a piece is to clean the existing finish using low odor mineral spirits. The mineral spirits are applied the finish with #000 steel wool and worked in the direction of the grain. The purpose of this is to remove the old wax and oils from the finish and clean the finish so there will be no bonding issues with any new finish that is applied.
 After the mineral spirits are applied , I allow it to dry on the piece, creating a white hazy powder over the entire finish. Once this is completely dried, I remove the residue with a clean piece of steel wool.

Veneer Repair

The veneer on the front of the case had loosened in many places and needed to be glued in place. A good way of finding the loose areas is to go methodically over the entire surface and tap the veneer. There will be an audible difference in the tap where the veneer is loose. I put a piece of the tape on that spot to help me remember the loose areas.


Before gluing the veneer back in place I use the back side of a no.11 X-acto blade to scrape away the old glue.

 Where the veneer is loose, but not loose enough to get a tool under, I use a syringe to inject hide glue into the gap.
 

I have several broken pieces of furniture that I keep on hand that are missing essential parts or are other wise not worth restoring. I use them to cut veneers so that I can match the color and finish wear as best as possible. Below are two two sections of re-purposed veneer I cut on the table saw from solid stock and used to patch the veneer that was missing on the case.

 Below to the right of the missing section is a patch left oversized that I used to patch the veneer.
 

The patch is laid over top of the area to be patched and the veneer on the case is scored along the edges of the patch. In essence, the original veneer is cut to fit the patch, instead of the patch being cut to fit the original veneer.
 To level the patch  I used a razor blade as a scraper to slowly remove material from the back side so that the patch sat level with the surface.

The leveled patch was then glued in place using hide glue. It was clamped in place overnight to let the glue set. After the patch was glued in place, I cut the excess wood from the top and bottom of the apron.

 Because the hide glue can take a long time to set,  I try to glue as much as possible in a single session. The photo below shows clamps holding down loose veneer while the glue dries.
Feet Extension

Taking a large detour from the concept of conservation, the owner of the piece asked me to extend the height of the piece by two inches. While this is not something I typically do, I felt inclined to follow the owners wishes, so I devised a way to heighten the piece while altering it as little as possible.

 I started with a quarter inch thick piece of reclaimed mahogany with a nice old finish. I cut two boards from this with one edge on each board beveled at 45 degrees. This allowed for a mitered corner.

 I then glued the two pieces to a core of  new mahogany. These two edges would become the two flat outer faces of the foot. The inside corners of the feet needed to be either rounded or beveled, so I did not attach old wood to the two inner faces.

 After the glue had set I cut four two inch sections and rounded the edges on two and beveled the other two. The interior profiles of the legs of the front were beveled and the back two had the rounded edges.

To minimize the damage to the original legs I glued the feet on with no joinery. Instead of joinery I recessed a screw which extended from the new foot into the old.. This created a much smaller hole than a tenon of wood and if some future restorer wanted to reverse the damage, it would mean removing the screw and knocking the new feet off.


The finished wood was sanded a little bit and the inner faces were stained to match the color of the legs. Wood putty and wax filled any gaps.
Repairing the cracks

As mentioned above, the top had many cracks in it that were caused by shrinkage. The cracks can be seen below.

 The first step in repairing these cracks was to clean any dirt or old glue out. This was done with the back side of the no.11 x-acto used as a scraper.

 I cut long wedges from mahogany stock with the blade of the table saw set at 5 degrees. I generally keep the angle of the taper at 5 degrees for these wedges but adjust the width of the wedge as needed to fill the crack.


After the wedges were ripped I cross cut them to fit the length of the cracks. I then tapped the wedges in place with a mallet. As the crack widened, the wedge would seat lower in the crack. The wedges were glued in place and the glue was allowed to set.

Once the glue had set, I scored a bit above the surface to remove most of the waste material. Before discarding the waste, I laid it alongside the wedge to help me remember which direction the grain was going. When you have multiple wedges to level, this can be helpful.


 The next step was to level the wedge with the surface. This was done with a chisel and ultimately a little fine sand paper.

This photo shows all of the wedges leveled and ready to be touched up.

 When I am ready to touch up. I first apply a coat of finish to the area to be touched up so I can get a sense of color and sheen. I use dewaxed shellac to seal the old finish because it chemically bonds to the original alcohol based finish and has less adhesion problems then an amber shellac containing its natural waxes.

I then apply powder stains with lacover padding finish as a solvent to the touch up the patch. The first step in this case was to apply a yellow back ground color. 

 I then applied a red that closely matched the mahogany lightly over top, allowing the yellow to come through a bit in places.

Gradually, the red stain was applied until the patch started to disappear..

To fine tune the touch up,  red mahogany liquid stain was also used on the touched up area. I find that this really helps to give depth to the touch up and blends it to the rest of the surface. Off all of the tools a restorer uses, I have found touch up to be the most challenging!
 Applying the Finish

As mentioned earlier, I use both dewaxed and waxed shellacs for different purposes. I have found that shellacs containing wax can have issues with old finishes causing the old finish to crackle a bit. This is not the end of the world, and there are different ways of dealing with this, but if it can be avoided, it is better. One way I do this is to apply dewaxed shellac as a sealer coat over the old finish. I may do this a few times. I then switch back and forth between amber waxed and dewaxed shellacs. The shellac containing wax is easier to buff and lays on a bit smoother and thinner. Dewaxed shellac builds up fast and creates a very shiny surface. By using the two together, I am able to control the sheen and get the desired results. If a harder, more durable finish is desired, I tend to coat with dewaxed shellac, especially on top surfaces.

Which ever finish is used, I apply it in thin coats with cheesecloth. I always apply with the grain and work from the inside of a surface out to the edges.

Between coats I abrade the finish with steel wool. The #000 steel wool dulls the finish quickly but can leave visual scratches in the coat that is abraded. As The finish gets closer to completion, I switch over to #0000 steel wool to dull between coats. Below is a photo of  the restored finish on the piece. After the finish cures, I usually abrade the finish one last time with #0000 steel wool and then apply paste wax to the finish and buff it out with cheese cloth.
 Odds and ends

While coating, I sometime apply a wash coat to the interior surfaces. This is a coat of thinned  amber shellac which gives the surface a clean appearance, but not a finished appearance. The drawer on the left in the photo below has had a wash coat applied while the one on the right has not.

If a lock is present in the piece, I usually cut a key for it and clean and lubricate the lock mechanism. This piece had one locking drawer and a key that threw the bolt, but would not unlock  it all of the way, leaving the bolt protruding from the selvage. This was because the bit on the key was not quite long enough.


 I have a tool box full of old keys I have collected of various sizes and lengths. I found one that fit the lock and made a few extra cuts in the bit of the key so that it could pass over the wards in the lock. The key on the left in the photo below is the one that came with the piece and the one on the right is the one I provided. The bit was just a bit longer on the new key and allowed the bolt to completely return into the lock case


Unless a customer asks that the hardware be left "as is", I usually clean it a bit. This brightens the look of the piece overall and any cleaning will later tarnish. The back plate below was lightly cleaned using #0000 steel wool and elbow grease. No finish was applied to the hardware so that it can be allowed to tarnish over time.

before
 After
The Completed Piece

Once the finish is waxed, I return the hardware to the piece and dust everything off. any last bits of touch up are done with a stain pen, and the drawer runners are waxed with paraffin wax. I usuually also provide a tassel with the new key to help it from being lost.


Hitchcock Style High Chair 3 (1970)

$
0
0
The Completed High Chair


Deja Vu all over again! One of the interesting side effects of writing this blog is that several of my posts have been read by people with a similar or, in this case, the exact piece of furniture. These customers then contact me, often with questions, or in some cases, to restore one just like the one that I did for another customer.

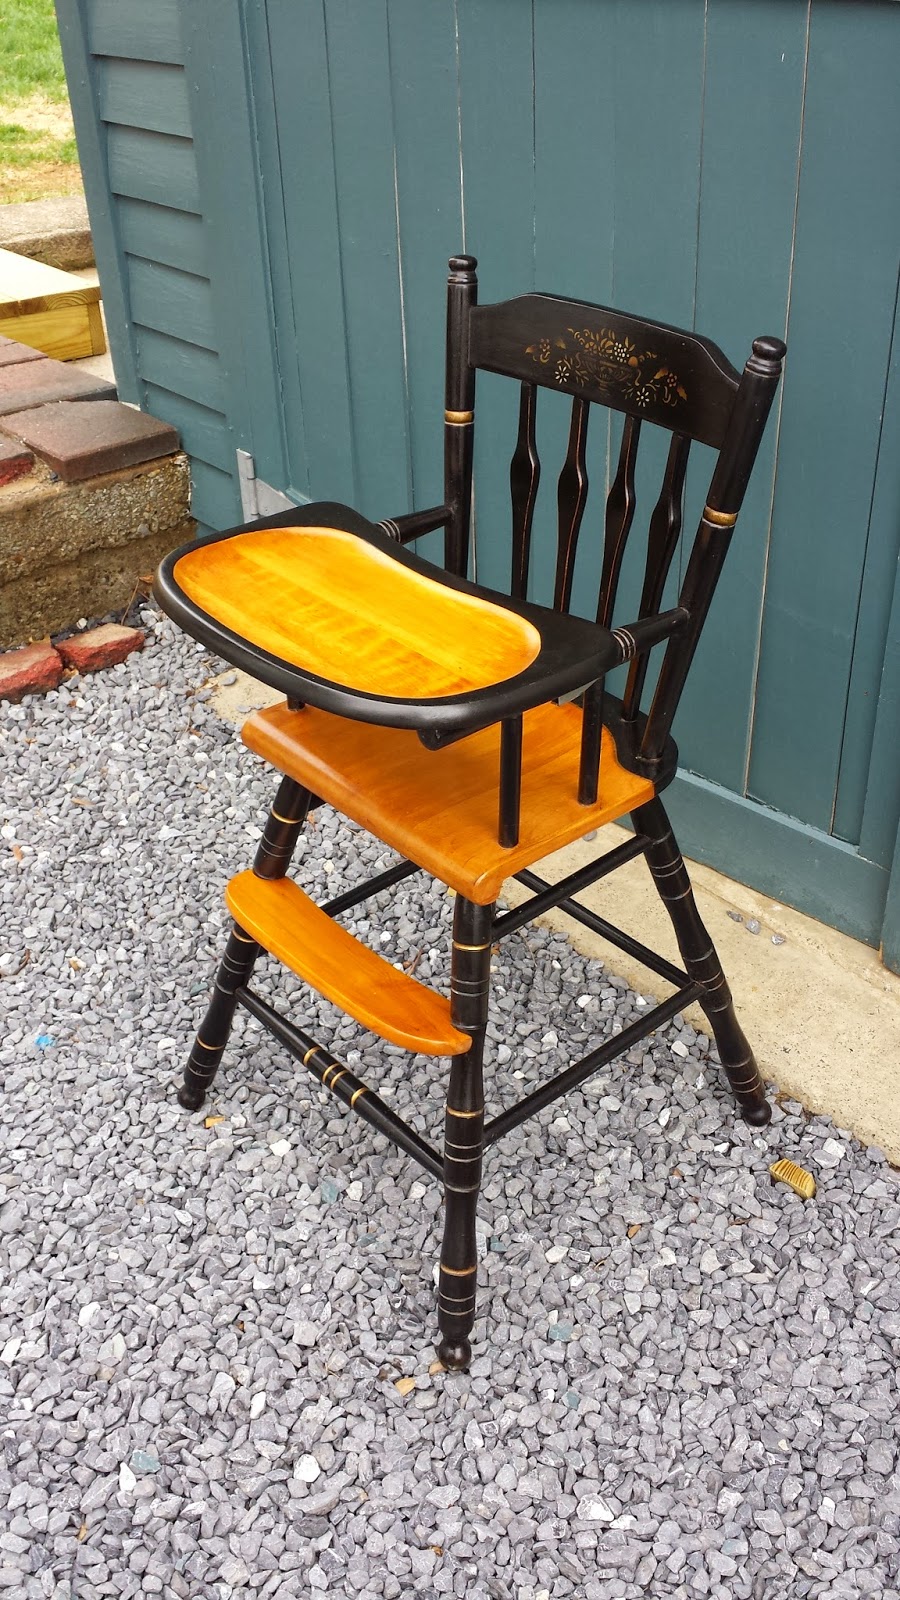
One of these reoccurring themes in my work was a high chair made in the style of furniture made by Lambert Hitchcock. These "Hitchcock High Chairs" were made in the 20th century (I am guessing around 1970). All of the examples I have worked on are maple with black paint on the majority of the chair. The crest rail is stenciled in the manner of Hitchcock chairs of the 19th century. I have yet to work on a white painted version, but they do exist.

I do not know if it was the 1970's incarnation of the Hitchcock Chair Company that made these chairs or if they were made by another company. I do know that in most cases, I can restore them and people from far and wide are contacting me to do so. So without further adieu, I bring you the third Hitchcock high chair to grace my shop.

I only got one photo of the chair as it came into the shop, and it was only a photo of the seat. The finish had peeled off of the unpainted portion of the seat and tray.


The process of restoration can be read in the links below to my earlier posts. The only thing we did differently was to finish the natural portions without staining them, which looked quite nice!

Hitchcock High Chair No.1:
http://johnmarkpower.blogspot.com/2011/06/hitchcock-style-high-chair-ca1970.html

Hitchcock High Chair No.2:
http://johnmarkpower.blogspot.com/2011/08/hitchcock-style-high-chair-2-1970.html


If anyone is looking for one of these chairs, I have one that I would love to sell. It needs a bit of work, but I can do that. Please feel free to email or call me at 703-727-5691 if you are interested!

A Visit to the Stickley Music Cabinet

$
0
0
I recently went to see the customers I built a reproduction of a Stickley music cabinet for. I always love to see how a piece looks after a bit of time away from the shop. I was pleased to see the cabinet prominently displayed in the foyer and full of sheet music. I took couple of photos that I included below. Here is a link to the original post I wrote on the construction of the piece:

http://johnmarkpower.blogspot.com/2014/08/stickley-music-cabinet-2014.html 

I'm also including a link to another blog by Robert Lang about my original post. Bob's original article on the construction of the cabinet for Popular Woodworking was a great help to me when it came time to build this cabinet. It was a great complement to read his review of my work. If you have the interest and time, Bob's website is a treasure trove of information about Arts and Crafts furniture and its construction.

http://readwatchdo.com/2014/08/stickley-music-cabinet-a-different-approach/


American Empire Chest of Drawers (ca. 1830)

$
0
0


The Completed Chest
I have written a fair amount about American Empire period furniture on this blog. This furniture was produced from around 1830 to around 1860. The use of thin veneers of crotch mahogany over a substrate of a cheaper domestic wood, in this case pine, allowed for an inexpensive means of mass produced furniture with fantastic results. In the case of this chest, every surface was veneered, including the sides and top. Where it mattered most, like the top and drawer fronts, sequenced pieces of fancy crotch veneer were used in a bookmatched pattern to display the dramatic grain of mahogany.

This piece was made using a mixture of machinery, like circular saws, and hand work, like hand cut dovetails. To me, one of the most interesting aspects of this period is seeing the introduction of mass production techniques and what the craftsmen could accomplish with the use of machines and what was still necessary to do by hand. As the 19th century progressed, more of  these procedures were accomplished with the use of machines, culminating in the machine made dovetail (ca. 1900). During the American Empire period, most of the work was still done by hand.

The chest was in pretty rough shape. The finish had darkened and deteriorated to the point that it became necessary to remove the finish and put a new French Polish on it. The case and drawers also needed work, both on structural and cosmetic levels. Below are a few photos of the piece with the finish removed.

In this photo, you can see the second long drawer down is in askew. This is due to the missing interior runners that would work as guides and support for the drawer. Also note the missing escutcheons on the two center long drawers.
 The top of the case as well as the top of the glove drawers were veneered with bookmatched crotch mahogany, like the drawers. The top of the case had developed a significant crack along the grain. The glove box top had warped severely as well
 

The case sides, veneered with straight grain mahogany, were also cracked.
 This photo shows the stretcher between the ogee drawer and the lower long drawer removed. The glue had failed and re-gluing this tightened up the case quite a bit. The following photo shows the stretcher being glued.


 These next two photos show the top of the glove drawers  being glued and straightened. Jesse, who did this repair, came up with some clever clamping!
 

 The crack in the top (seen in the next photo) was patched by means of wedges that were inserted and then, once the glue was dried, carved down flush with the surface of the top. The entire repair was later touched up.

The existing interior runners were significantly worn, so they were removed. The wear flattened with a hand plane (as seen in the next photo) and the runners were put back in place. The missing interior runners mentioned above were made using old pine stock and fit to the case.
These next two photos show the drawers in case while finish was being applied. Note the brass escutcheons in the drawers. Two were missing and replaced.

The remaining photos show the completed chest. Jesse took some interesting photos of the case with a filter on, making the piece appear darker. I included these because they show the dramatic grain of the crotch mahogany.


Painted Chairs (ca 1990)

$
0
0
The Completed Chairs
One of the things we have started doing this year on occasion is to paint furniture for customers. We were hired earlier this year to paint a set of eight chairs and reupholster them as well. The chairs were around 25 years old and the customer loved them, but wanted a color change. Below is a photo of two of the eight (originally they were painted  yellow, red, and eggplant). The rest of the photos show the painted chairs with the new upholstery.


Some Recently Completed Pieces

$
0
0
19th Century English Cherry Dressing Table
I have developed a bit of a backlog of photos of completed work over the past couple of months. In an effort to catch up I am showcasing some of the more interesting pieces that have come through the shop recently. Below I will describe the pieces and the work we did to them.

1. English Lath Back Windsor Chair
 This was one of my favorite chairs to ever come through the shop. It is a Lath Back Windsor made from various woods including beech and elm. It was made sometime in the middle of the 19th century. 

These chairs are great, they have great form and are very comfortable. This one had loosened up so I glued the loose joinery. The wear on the chair was wonderful, especially on the arms, so we simply cleaned and waxed the finish.

2. Four Ladderback Chairs
 
These chairs are pretty run of the mill, and were probably made around 50 years ago. I chose these to showcase the great job my caner did on the rush seats! Beyond the seats, I glued the loose joinery, and cleaned and waxed the finish.

3. Parquet Table with Draw Leaves
I have written about draw leaf table before on this blog. All of the examples that come through the shop seem to be from the early part of the 20th century. This one was made form European walnut and beech. It had a French country style, and was probably made in France or possibly another country on the European continent. This table was in pretty rough shape, so we removed the finish and refinished it with a French Polish finish.


 4. Walnut Breadboard End Table 
This table came from Switzerland and was made from old boards of European walnut. That being said, it was made fairly recently. I liked this table a lot because it reminded me of the first dining table I made, which was also of walnut. The finish was in bad shape, so we refinished this with a French Polish finish.


 5. English Cherry Dressing Table
This was a sweet little table, made from European cherry in the early part of the 19th century. Despite the cabinetmakers attempts to use good straight grained wood, the back legs had warped severely! Because it was stable and there is no real way to fix this, I left them as is. This piece was refinished with a French Polish finish.


6. Walnut Drop Leaf Table
This table had some beautiful walnut veneer, as seen in the photo below. It was made in the 1930s and I refinished it with a French Polish and found a new walnut knob for the drawer.


7. Reproduction John Shaw Four Drawer Chest
This chest was a lovely reproduction of  a chest made by John Shaw (1745- 1829), a cabinet maker from Annapolis, Maryland. The reproduction was made by Biggs Furniture of Richmond, Virginia. The chest, like the original, had beautiful crotch mahogany on the drawer fronts. Quite a lovely piece, reproduction or not!

8. Mahogany Display Stand
 
This stand had a lot of work put into it. The top was edged with inlayed banding, some of which was missing and we had to recreate. We also glued the loose joinery, replaced some of the glass, covered the bottom with felt, and refinished the entire case.


I am sure I have more photos like these so I will probably be putting together another post soon of pieces that were recently restored.
Viewing all 57 articles
Browse latest View live