Quantcast
Channel: John Mark Power, Antiques Conservator
Viewing all 57 articles
Browse latest View live

Expanding Dining Room Table with Joseph Fitter Screw Expander Revisited (ca.1870)

$
0
0
The Completed Table

In 2009, I restored an expanding dining room table that was fitted with a mechanism called a screw expander. The mechanism consists of a long threaded screw that turns in a long tube nut. Both pieces are fitted to either end of a dining room table and when turned by a removable crank or winder from one side, the screw and the nut work against each other and the table is opened. The beauty of this hardware is that it allows one person to open the table so that leaves can be put in, versus the traditional methods using one person at either end pulling the table open. A deeper look at the history of the screw expander and one of its principal manufacturers, Joseph Fitter, can be found here:


The following link shows the second half of the post I wrote and has some completed photos:


One of the books I used to research the screw expander was The Cabinet Maker's Assistant published by Blackie and Sons in the 1850's.  The author was anonymous. It has great drawings of the mechanism and construction details for building a table that would utilize a screw expander. I bought a reprint by Dover Press, but there is also a scanned copy of the original available here to view online:


Of all of the pieces I have written about on my blog over the years, I have received the most comments, emails, and calls about the original post I wrote on Joseph Fitter and the screw expander. I have gotten emails for as far away as Australia and  Norway and even once got a call from someone in Trinidad concerning these tables. Most questions regarded where a person might replace a missing table crank or even the entire mechanism. Others inquire as to what the value of their table might be. 

Recently I received a call from a woman who had one of these tables and was not only relatively close, but also wanted me to restore the piece. I was delighted at the prospect of working on another of these tables and we made plans for me to pick the table up. While on the phone, the customer informed me that the previous owners of this table were Rear Admiral George Stephen Morrison and his wife Clara. Rear Admiral Morrison was the commander of the U.S. Naval forces in the Gulf of Tonkin during the incident there in 1964. In addition to this, they were also the parents of the singer Jim Morrison, Front man for the band "The Doors".

The Morrisons had owned the table while living in London in the 1960's. When they moved back to the United States they sold the table to the current owners, who later shipped it here. The owner told me that at the time, Jim Morrison was already living in California and probably never took a meal at this table.

Even without all of this historical interest, this table is a fine example. The table is made of good mahogany and uses oak as a secondary wood. The screw expander was comprised of a long screw, a second larger hollow screw which also functioned as a tube nut for the first, and finally an even larger outer tube nut. This telescoping design allowed for the expander to open wider allowing for more leaves to be inserted in the table. This example accommodated two wide leaves, while the first one I worked on only one. In addition to all of this, the detail of the craftsmanship in this table was superb and the ornamental elements, like the turnings and the carvings, were well executed. 

Over time the table had developed a few problems. The biggest was that the table's wooden slides that keep the table flat when open had worn and stopped functioning correctly so that one set of table slides would jump the track once the table was opened up. To remedy this, the table was lifted while being opened by the top on one side to attempt to keep the slides on track. This led to the top becoming partially detached from the base on one end. Besides those mechanical issues, the finish was damaged but restorable, and the slides and screw mechanism were in need of cleaning.

Below are photos of the table and the work that we did to restore it to a functional and beautiful state. At the bottom of the post are several photos of the restored table.

This first photo shows the table as it came into the shop. The leaves are not inserted in the table in this photo.
This detail shot shows the cleaned label on the screw expander, bearing the name Joseph Fitter.
These next two photos show the state of the table sides and the mechanism when the table came into the shop.

The hazy area in the photo below is an area where the finish had been eaten away on one end of the table.
These next two photos show some veneer being glued down on the outer surfaces of the table slides.
The end closest to the viewer is missing the table top in this photo. It was removed for patching.
As mentioned above, the table end hand been lifted by the top repeatedly causing the screws that fasten the top to the base to tear out. Below is a photo of the top flipped over to work on.
This photo shows one of the screw holes that had torn out.
The remedy for this is to drill out the torn area with a Forstner bit,creating a flat bottomed hole. Face grain plugs of the same diameter as the Forstener bit holes are then inserted in the holes with glue. Once the glue has set up, the plugs are pared flush with the underside of the top and the screws are fastened into the new wood. None of this repair is visible from the top. Below are a few photos of the process.

The Forstener Bit holes.
The Face grain Plugs inserted.
A face grain plug pared flush, the excess scraps are used again down the road for the same procedure.
These following photo shows the base with top completely removed. The table slide on the far side of the base has a significant droop in the center.
These next two shots detail the slide that had fallen out of its track. The pieces that guide the slide in a straight motion had worn away and needed to be replaced. This is one reason that the slide did not function properly. The other was that the joinery on one end of the table had loosened up and the glue blocks that added strength to that joinery were missing. New guides were made for the slide and the joinery was glued and new blocking put in place, as seen in the photos below.

Gluing the loose joinery on one end of the base.
The guides for the table slides removed from the table. The one on the bottom is the original and the one on top is the replacement.
This view of the same guides from one end shows the wear on the original (the one on the right). This worn wood allowed the slide to slip its track and malfunction.
The next photo shows the base disassembled while the guides were replaced.
The replaced guide.
Once the joinery was tightened, the missing glue blocks were glued in place and stained to match the original color. The next few photos show that process.


These next photos show the base repaired and the mechanism lubed. The slides were cleaned and shellac was applied and then waxed with paraffin wax to allow the table to open and close as it should.

After the repairs were made, the finish was restored, color was selectively added to the faded top, and the hardware was polished. Below is a before and an after shot of one of the casters before and after cleaning.


The remaining photos show the restored table from various angles and with the leaves in and out. It was a pleasure to have such a fine table (and one with such an interesting history) come through the shop.


Mahogany Chest on Chest (ca.1790)

$
0
0

The Completed Chest
The chest on chest or double chest is, as the name states, a chest stacked on a second chest. Today the form is seen in one piece construction but originally it would have been composed of two separate chests. The bottom chest is slightly larger in most forms and has molding attached to the top which hides the joint where the top is stacked. The upper chest is capped with a molded pediment that gives a bit of lift and completion to the form. 

The chest I recently worked on dates to the fourth quarter of the 18th century. Three details point towards this time period. The first is the use of a straight bracket foot on the bottom, which appears in case pieces during that period. The second indication is the orientation of the drawer bottoms from left to right, instead of front to back. This orientation was a development of the second half of the 18th century and the change was made so that the wood could expand and contract easier and less cracking would occur due to humidity changes. The third indication of age is the use of brass cased locks in the drawers. All of the locks are present in this piece and appear to be original. The use of brass cases over iron cases originated during this period. Beyond the dating of the chest I can tell by the construction methods and the woods used that this chest on chest was produced in England.

The piece as it came to me was in need of a new finish. The existing finish was modern and had begun to deteriorate. There were also several routine repairs one would expect to see in an 18th century piece of furniture. Below are a few photos of the piece during the repair process followed by two photos of the completed chest on chest.

These first few photos show the chest on chest as it was when it came into the shop.
 

This photo of the side of the top shows the beautiful grain of the veneered sides of the chest and also a bit of missing astragal molding that transitions the pediment to the case side.
These next two photos show the chest with the finish removed.

The boards that cover the joinery where the drawer dividers attach to the case sides were loose. This is due to shrinkage of the case sides. The clamps on the left and right sides of the case are holding these covers in place while the glue dries, as seen in the two photos below.

One side of the upper chest had a significant crack running from top to bottom. This again was due to wood movement. A long tapered wedge was glued in the crack, as seen in the photo below. The wedge was left proud while the glue dried, and then pared flush to the side once the glue had set.
The opposite side of the chest had loose veneer where the side had warped. The deep clamps in the photos below are gluing this down. The replaced astragal molding is also being glued in place on the top of the case.


After the glue had set, the astragal molding was fine tuned and sanded. The patch is seen below just above the blue tape.

Many of the drawers were missing the cockbeading that frames the drawer faces. This was all replaced and any loose beading was glued in place. a replaced section is seen in the photo below.
The top of the upper chest had a crack in it which was repaired the same as the crack in the side mentioned above. The photos below show the wedge as it was refined. This first photo shows the wedge inserted and gluing in place.
Once the glue had dried, the wedge was pared flush to the top using a combination of a smoothing plane and a hand chisel.

the wedge was further leveled with scraping and sanding. It was later stained to match the color of the top.

This photo shows the top half of the chest after the repairs were made and the entire piece was sanded. The chest on chest was selectively stained to match the natural color of the wood on the drawer fronts.
One feature that this particular chest had was what is referred  to as a brushing slide. This is a board that sits directly above the long drawers in the bottom half of the case. It has two brass pulls that allow the user to pull the board out. The board would have originally been covered with a baize.

Contrary to what most people would assume, This panel was not meant to be used as writing surface, but the purpose was to have a surface to lay out clothes for brushing off, hence the name brushing slide.

The slide in this piece had warped and the felt that was on the piece was frayed and loose in many places. The existing felt can be seen in the photo below.
Once all of the felt and glue was removed, the surface was leveled with a jack plane, as seen in the photos below.

After the new finish was applied, it was masked and glue was applied to the wood sub surface, as seen below.
The new baize was then laid out and smoothed.
The next step was to define the edges of the slide and trim the excess baize from the slide.
The restored slide with new baize applied.
This last photo shows the brushing slide extended from the lower case.
These following photos show the restored chest on chest. The light was a little dark, so the color appears a little darker than it really is. The photo above shows the color a little better.


Georgian Mahogany Drop Leaf Table (ca. 1770)

$
0
0

The Completed Table
A table we recently worked on in the shop was a mahogany drop leaf  table made around 1770. I beileve that this table was made in England because of its form, which was a rather small version of a drop leaf that was used as an occasional table, in the same way in which a tilt top table was used. When needed, say for serving tea, the table could be carried to a location and set up, giving a good surface for three or four people. after the table served its purpose, the leaves could then be dropped, significantly reducing the floor space that the table took up. The table could then be set against a wall where the grain of the vertically hanging leaf could be admired.This is also important because mahogany furniture was seen in the 18th century as a status symbol, and the ability to display the wood was desirable.

The woods used in this table are fine West Indies mahogany as the primary wood, with pine and beech used a secondary woods. Mahogany would have been imported to England and America both, and beech and pine were both used as secondary woods in America and England. The reason that I think this table is English is that the form of this smaller drop leaf is seen much more in English Furniture than Colonial American. The Americans favored the tilt top as an occasional table And I have never seen an example of a small drop leaf like this made in America. That being said, that is all I have to go on and the woods used and joinery techniques offer no clues as to a place of manufacture. If  the table could be identified as American the date of manufacture might be slightly later. As it stands, I call this table Georgian because it was made during the second half of the 18th century and while it displays a turned Queen Anne foot, the use of mahogany instead of walnut placed it at a latter date, placing it in the Georgian period of  furniture history.

The table had a nice old finish on it that was restorable, and most of the problems lay in some structural failures that had occurred in its 200+ year history. One of the most noticeable was a failed hinge, which caused the leaf to hang crooked. I have detailed the repairs and restoration of the table in the photos below. They are followed by a few photos of the restored table.

These first few photos show the table as it came into the shop.
This detail photo shows the failed hinge, which caused the leaf to hang low.


The legs of the table had suffered many dings and scratches over the years causing a loss of finish and lots of wear.

There were many areas where structural damage had occurred. The reversal of this damage was only done if the damage caused the table to function incorrectly. If the damage was superficial, it was left as a sign of the age and antiquity of the piece. The area seen below was repaired because it was where a screw fastened the base to the top, and leaving the damage would have caused the screw to not seat properly and firmly attach the top to the base.
The construction of the table is really interesting. The base started out as a box made of pine with mahogany ends. These ends were dovetailed into the pine much the same way a drawer front is dovetailed to a drawer side. The name for the type of dovetail is a half blind, meaning that the dovetails are concealed when viewed from the front (the mahogany ends). The legs were attached through pegged mortice and tenon joinery to a beach board that was attached to a second beech board. The two beech boards were attached at the ends using what is called a knuckle joint, which is a hinging joint. The beech board tenoned  into the leg was free to swing while the other board was screwed and glued to the pine board in the frame. This allowed one leg to swing open like a gate (hence the term "gate leg") and support the leaf when it was raised. While the joinery was succinct and well executed on this table, over the years glue had failed causing the legs to function improperly. The table was dismantled so that these joints could be cleaned and glued. The photo below shows the internal frame described above with the gate legs removed. The frame is being glued in photo below.

After the glue had set, the clamps were removed. In the photo below, the frame is seen with the pine side facing. the right side of that board is the area that the beech gate assembly was attached to. To the far right you can see the half blind dovetails discussed above.
The frame is seen here with the legs and gate assembly surrounding it. The lighter areas are where the pieces would be attached.
The top was removed for all of this repair work, and the hinges were removed from the top. All of the screw holes were plugged and re-drilled during this time so that the hinges would seat properly and function flawlessly. The plugged screw holes can be seen in the photos below.

Before attaching the gate assemblies, there was a rather large portion of the pine that needed to be patched. The next few photos show the process of attaching the new wood.

The patch after the glue had set. It was later planed down flush with the surface of the pine and stained to match.
Once the patch was in place, the old glue was cleaned from all fo the surfaces and the gate assemblies were attached to either side of the frame using traditional hide glue, The same glue that was on the table to begin with.


 One hinge mortice was missing a large section of wood and needed a patch. The patch is seen below in place. The following photos show it drilled to receive the hinge and then stained to match the color of the original wood.


 As discussed above, the legs were pretty beaten up. They were lightly sanded to remove the majority of the damage and then new finish was applied. The original finish was still in the pore of the wood, which aided in rejuvenating this finish and retaining the original color. The photo below shows the legs sanded.


 A very small amount of color was added to the top surface to even out the overall color. The bleached look was retained as seen in the photos below.

The top during the restoration of the finish.

I mentioned the bleached color of the top above in part because in the photos of the completed table below, the top (and the table in general) look very dark. This is due to the brightness of the daylight that particular day. At any rate, the table looked great restored as seen in the photos below.


Mahogany Linen Press (ca. 1800)

$
0
0

The Completed Linen Press
 The linen press, or cabinet on chest, is a furniture form primarily found in England that became popular in the early part of the 18th century and remained in use well into the 19th century. The purpose was the storage of houshold linens like table linens, etc. Most examples will have a chest of drawers on the bottom with a cabinet housing several open drawers on top. I assume that the purpose of the open drawers was to store the table linens and the closed drawers below were for other household items. By open drawer, I mean that the drawer was shallow and more like a tray. The front of the drawer was lower than the sides allowing one to view the contents easily. These drawers would be concealed behind the closed doors, keeping dust out. With the addition of the lock on the door, the contents were also kept safe.

The linen press I recently worked on was a 19th century example, made of mahogany as the primary wood. The secondary woods used in the piece were pine and oak. The finish was in a restorable condition, but the piece needed work like replacement of cockbeading and drawer work. The internal drawers described above that would go in the cabinet were missing and in their place were mahogany shelves that were unfinished and suspended on screws driven into the sides of the case. there were lots of other repairs and the finish was cleaned and restored as well.

 Below are a few photos of some of the work followed by photos of the completed linen press.

The left door on the cabinet had a piece of astragal molding that was attached to the door frame on the side that abutted the right door. This molding's purpose was to cover the gap between the two doors. At some point a large portion of this molding had broken from the door frame. The photo below shows the molding being reattached to the frame. The dusty appearance on the finish of the door is the dried mineral spirits applied to the case at the outset of the work, The purpose of the application of mineral spirits to a finish is to clean old wax and dirt from the finish. Once this is done new finish can be applied to the old without the interference of the dirt and wax, causing a better chemical bond between the two finishes.

This photo shows a wedge inserted in the side of the case. It fills a crack that was caused by shrinkage in the case side.  The wedge was later planed and pared flush to the side.
The upper cabinet case was loose and needed to be tightened. The photos below show a variety of repairs being performed simultaneously. The case is being glued, a long wedge is being attached from below the case and loose dovetail joinery is also being wedged. The traditional hide glue used in these repairs takes a long time to completely set up, so rather than attempt the repairs one at a time, as much is done in one session as possible so the case can later be reoriented and other repairs addressed.

This photo shows the two wedges described above.
One of the short drawers had this phrase which looks like "Squilib x.ar.- P.S" written on the bottom of the drawer. This seemed to be written as a signature of some sort, and not some sort of cabinetmaker's note. Perhaps I am reading it wrong, but I was unable to figure out what this said. If anyone wants to take a crack at it, the writing can be found in the photos below.


The molding on the top of the lower chest which covers the seam between the chest and the cabinet was loose. The molding was removed and the glue was cleaned. The molding was then attached with new glue. The photo below shows the molding removed from the case.
This fuzzy photo shows the bottom chest upside down and blocking being glued in place. The front transitional molding from the bracket feet to the case was also loose and it is being glued back in place.
These last few photos show the completed linen press with the finish restored and a fresh coat of paste wax applied. One other repair not documented in photos was the finishing of the internal shelves, which were also made to slide in the case like the originals would have (instead of being suspended on screws). The hardware, which is not original to the piece, was also cleaned.


Biggs Mahogany Pedestal Dining Table (ca. 1960)

$
0
0

The Completed Table
 A recent piece to come through the shop was a reproduction mahogany pedestal table with three leaves. The table was made by the Biggs Furniture Company of Richmond, Virginia. Biggs specialized in quality reproductions of antique designs and was in business until 1974 when the company was acquired by the Kittinger Furniture Company. 

The table was made primarily of solid Honduran mahogany. The top had an inlayed band of satinwood around the perimeter and maple was used as a secondary wood where the pedestals attached to the tops. The original finish on the table was a lacquer which had faded and yellowed with exposure to sun light over the years. The mahogany wood beneath had also faded, removing the red mahogany tones from the table entirely.

It was the customers desire to try to give the table a more modern feel and as we talked over options she suggested the possibility of ebonizing the table. We looked it over and decided that by maintaining the satinwood border, the table would have nice contrast and so we decided to go through with this. In addition, the customer requested that we remove the brass casters (which were tearing up her floor) and replace them with wooden wheels. The process of ebonizing the table as well as the novel way of replacing the brass casters (executed by Jesse Melton) are documented below.

These first few photos show the table as it looked when it came into the shop. Between the deterioration of the finish and the bleaching of the mahogany, the contrast between the mahogany and satin wood was barely visible.


This close up shows the satinwood inlay around the top.
 
 After the finish was removed and all of the repairs were made and the surface prepared by sanding, the satinwood border was taped off to mask it from the black stain used to ebonize the wood. The masked top can be seen below followed by a few other similar photos.


 The following photos show the base and top after the stain was applied.


The brass casters which were causing damage to the customers floor were removed from the housing that attaches them to the table. The brass shoe that attaches to the leg and the housing were kept. In place of the brass wheels, wooden wheels of the same diameter and thickness were removed from another set of casters and modified so that they could be attached to the table's casters. Below are a few photos of this process.

This photo shows a jig created to hold the wood wheel in place while the center hole was bored out. The following photo shows a wheel in the jig. The next photo shows the bored hole in one of the wheels.


In this enlarged hole was inserted an aluminum sleeve. The sleeve helped the wood wheel from rubbing against the axle and wearing. The two photos below show the aluminum sleeve being cut to the proper length.


After they were cut, the sleeves were inserted into the wheels and set aside. The actual axle used was a brass bolt which was cut to length as seen in the photos below. The brass bolt was inserted through the housing and the wheel and then a brass acorn nut was attached on the threaded side of the bolt to keep it in place. the bolt was locked in place with locktite to prevent it from un-threading when in use. The beauty of this was that the bolt could be removed if one of the wheels were broken or worn and we provided an extra set of wheels if this happened.

This photo shows the completed caster assembly. the next photo shows all of the casters with the brass cleaned and the new wheels in place.

Back to the table, this photo shows the table with the tape removed from the satinwood border. This photo was taken during the finishing process.
The remaining photos show the table completed with and without leaves. It was a rainy day so no photos could be taken outside, but it looked really nice inside as well!


Mahogany Dining Room Table with Tulip Wood Banding (Ca. 1920)

$
0
0
The Completed Table
With the holidays comes the inevitable restoration of a dining room table or two and this year has been no exception! One of thetables we restored before Thanksgiving was this beautiful veneered mahogany dining table. There was no name associated with this table save the name on the slides which was the  Watertown Table Slide Company. The Watertown Table Slide Company, of Watertown, Wisconsin, produced table slides for nearly 100 years before being bought by Reiss Industries in 1985. Like Walters of Wabash, the company produced slides for other manufacturers to use in the construction of expanding dining tables. With this in mind, the table itself was not produced by the Watertown Table Slide Company, only the slides. For a look at some history on the company, you can follow the link below. My favorite part is the advertisement stating that the slides work so well that "the gentle effort of a child will extend the table at both ends." I have yet to meet a table where this is the case, but it is nice to dream!


What I can say about this table is that it is a reproduction made in the style of Hepplewhite. The primary veneer used on this table is mahogany, and the table is inlayed with stringing on all of the primary surfaces, including the legs and aprons. The stringing was made up of a light wood (probably holly) and a wide inner band of tulipwood. A bit of clarification here. By tulipwood, I do not mean tulip poplar, which is an American hardwood, but a exotic hardwood found in Brazil that comes from the Dalbergia family, the same family that produces rosewood. Tulipwood was used in the 19th century as a banding material much like satinwood. When first cut or sanded, the wood has streaks of pink to red lines with a pinkish white back drop. As the wood oxidizes over time the red fades from the wood leaving the streaks brown. In some cases fading due to sunlight will almost completely mute the varigation. The other woods used in the banding are probably ebony or perhaps some other darkwood. The combination of these woods is quite nice and contrasts the mahogany backdrop accentuating the lines of the table.

This table had a pretty worn out finish that masked a lot of the design discussed above. The customer and I decided it would look best with a new finish. The table was also in need of repair to the joinery of the aprons and base as well as gluing of loose veneer. below are some photos of the table before, during, and after restoration.

These first two photos show the table before restoration. The second photo shows the inlay on the top barey visible through the old finish.

This photo shows the stamped label for the Watertown Table Slide Company. established in 1889.
These next two photos show missing section on the interior of the apron where the aprons meet the legs. As the table was moved around over the years the pressure from the legs being moved caused them to bend against the apron causing sections to crack and break out.

This photo shows the most severe damage to the joinery. The leg should be vertical, but instead is skewed inward.
To repair this damage, the legs and aprons were removed from the top of the table. The top can be seen top down in the photo below. All of the joinery was disassembled and cleaned of its old glue and missing sections were patched with wood. Once the repairs were made the apron and legs were reassembled with new glue and attached to the top. Several photos of patches being glued in place are seen following the photo below.


Once the table was reassembled, new glue blocks were installed where the legs meet the inside of the apron where necessary to help add support to the legs. These can be seen in the photo below on either side of the leg.
A small amount of the banding was missing in places. Replacement banding was glued in place as seen in the photos of some replaced edge banding below.

As stated above, there was a fair amount of loose veneer on the table. The old glue was cleaned out from the veneer and new hide glue used to glue it in place. While the glue dried, the veneer was held in place by what looks like an excessive amount of clamps. This clamping helps insure that there are no bubbles in the veneer and that it laid flat. Sometimes so many clamps are used that it is hard to see the furniture that they is clamping!  

Once the repairs were completed, the table was sanded and a French polish was applied. The natural color of the mahogany was stunning and the table was stained selectively to match that color.

These last few photos show the table fully restored


Queen Anne Style Setee (Ca. 1930)

$
0
0

The Completed Settee

It has been a while since I have written about an upholstered piece so this post is devoted to the restoration of a Queen Anne style setee made sometime in the early part of the 20th century, I am guessing around 1930. At first glance, I thought that this might be a period Queen Anne settee. For a look at the restoration of a period sofa, follow this link:


Upon closer inspection of the underside of this settee, it was aparant that it was a modern piece made in the Queen Anne style. With this in mind, this was a well constructed settee with a nice shaped apron and down cushion. The interior wood used for the frame was poplar placing it's origin in America and  the wood used on the legs was mahogany.

The frame was in good shape but the webbing that held the springs in place had failed causing the seat to collapse. There were also several loose joints, mostly where the front legs attached to the frame. In addition, the fabric need to be replaced and the finish needed to be cleaned and spruced up a bit. Below are a few photos of the restoration of this beautiful settee.

This photo below shows the settee prior to restoration and upholstering.


As stated above, the webbing had failed on the underside of the settee as seen here. This was a bit of a blessing  because by removing it, it be came easier to access the frame from underneath and glue the loose joinery.

This photo shows the underside of the settee with the webbing removed. The front legs are also removed in this photo so that the old glue could be scraped form the joinery and the legs glued back onto the frame.

These next two photos show the frame being glued up. The legs are also being reattached to the frame.


After the repairs were complete, I cleaned the finish on the legs and added some french polish to bring back the finish. Once all of this was done, it was off to the upholsterer to be upholstered with the new fabric. Below are a few photos of the completed settee.


Federal Bachelor's Chest (ca. 1810)

$
0
0
The Completed Chest
Recently it has become harder to find the time to write, and as a result I have accumulated a surplus of pieces to write about. One of these pieces was a chest I worked on about a month ago. For lack of a better term, I will call it a bachelor's chest. A bachelor's chest is a primarily English form of chest of drawers that was scaled down in size for easy transport. Besides the smaller size of these chest, other characteristics were lifting handles fixed to the sides and either a top that folded out using Knife hinges (much like a game table) which would double as a writing surface or brushing surface, or an actual brushing slide that would pull out just above the top drawer. All of that being said, not all examples had all of these features and in modern times bachelor's chest has become a catch all term for diminutive chests.

As stated above, this was primarily an English form, but American examples do exist that would fit all of the criteria for a bachelor's chest. The chest I worked on exhibited some of the characteristics of a bachelor's chest and was called a bachelor's chest in the auction listing that it was sold under. Here is a link to that listing:

   http://alexcooper.hibid.com/lot/68009-36748-6282/federal-mahogany-bachelors-chest#.UnObihWHhEI.email

One thing that is for certain is that this is an American chest that was probably made in Upper Massachusetts or New Hampshire in the early part of the 19th century. The chest is made primarily of Mahogany and the drawer fronts are veneered with bookmatched panels of figured satinwood. The bookmatched veneer is framed with banding of alternating light and ebonised woods, probably holly. The top edge and skirt are banded with vertically oriented rosewood framed with holly.

 The sides had an incomplete set of lifting handles which appeared to be original and the brass pulls, while looking quite authentic, were replaced at some point. As seen in some pieces, all of the drawers had inlaid brass escutcheons but only the top two drawers were equipped with locks. The locks appeared to be original to the piece.

Below is a photo of the chest as it was when it came to the shop.
The top surface showed some significant water damage to the finish as well as bleaching form UV light.
The sides, besides being very dirty, were cracked.  Also in this photo is one of the mounting plates for a lifting handle. The other plate and the handle were missing from this side.
On the back side of the chest were remnants of a moving label from Marblehead, Massachusetts, a sea town north east of Boston. Judging by similar dated moving labels, I would date this label to be from late 19th / early 20th century.
One curiosity about this chest was that it appears to have been altered at some point. Below the top on the inside of the chest was evidence of old glue blocks which had failed. The "shadow" of these blocks is visible in the photo below. What was curious about these shadows were that they were located about one and half inches below the inner surface of the top. In addition, there was a consistent line that was visible about halfway between the inner surface and the bottom edge of the shadow. It appeared to be an outline of another surface that the blocks were attached to that was below the original top. This can vaguely be seen in the photo below.
On the sides the top was attached to the case by use of battens running from front to back which were screwed to the top and sides. These battens, seen below, are modern replacements.
Another interesting feature was the remnants of hinge mortises on the upper edge of the back panel and the lower edge of the back side of the top. These mortises suggested that the top was once hinged to the back and the shadows of the glue blocks mentioned above seemed to point towards an inner surface that was revealed when the top was lifted. Every board that I examined appeared to be original to the piece and the only really confusing part was that the hinge mortise on the top surface were a different size then those on the bottom surface. This would indicate two separate sets of hinges. The mortises can be seen below.
It is quite possible that this piece originally had a lifting top, but the evidence is inconclusive. It seems that all of the pieces were original and that no piece was re-purposed from another older piece of furniture. Perhaps another example will surface in the future that will shed some light on this.

The skirt of the chest was made of mahogany with an inlayed band of vertically oriented rosewood that was framed by holly. The skirt was not integral to the sides, but was applied with the grain running vertically, like the sides. Over time the skirt had broken into sections and had loosened up. Past repair showed that it was nailed back in place, which in the long term was not very effective. As a result, much of the skirt was loose and a large portion was missing and had to be recreated. Below is a photo of a section of the skirting followed by a close up of the banding.

These next photos show the underside of the case. A section of the loose skirting is seen laid on its side on the bottom of the piece.


To recreate the missing portion of the skirting I needed to make some of the rosewood banding. Many years ago I went to the recycling center in Lovettsville, Virginia to dispose of my cans and bottles. when I got there I saw a wooden frame leaning up against the metal recycling containers. The entire frame was made from solid rosewood. I brought the frame home and over the years I have used this wood for various patches on furniture. I used a small section to make the inlayed banding for this chest. The board used can be seen below.
I first cut four section of the rosewood with the grain running up and down, as seen in the photo below.

The next step was to glue these together to make a long strip, as seen in the next photo.
Once the glue had dried, holly veneer was glued onto the outside edges of the rosewood strip.
Once all of the glue had dried, I cut thin strips of banding on the table saw from the blank I had made. The finished product is seen below.
When making the missing portion of the mahogany skirting, I noticed that the inside face of the skirting was not perpendicular to the bottom, but raked at about a 5 degree angle. What purpose this served is beyond me, but being faithful to the original maker, I cut my skirt with the same profile. This can be seen in the photo below. You are looking at the edge of the skirting.
The same mahogany blank seen above is seen here with the face used for the outside edge facing the camera.
Using a rabbit plane, I created a groove along the edge of the blank for the banding to seat in.
The next two photos show the groove without and then with the banding in place.

This photo shows the new apron bank next to an old piece of the skirt.
Once the banding was glued in place, I fit the blank into the space for the missing skirting as seen below.
I next traced the profile for the skirt from the other side and cut away the excess so the blank fit the profile of the missing skirt.
These next few photos show the skirt and the new section of the skirt being glued in place.


Test fitting a bit of the banding to an area where a tiny bit was missing.
More gluing of the feet and the skirting.
This photo shows the new drawer stops being glued in place. The next photo shows the drawers fit in place. Notice how the shadow of the drawer pulls are lighter where the pulls covered the wood. This is because satinwood oxidizes darker when exposed to sunlight, while woods like Mahogany will lighten when exposed to the sun.

The finished chest with a restored finish and cleaned hardware.


The new lifting pulls were supplied by Londonderry brasses in Pennsylvania. They fit great!
A final photo showing the beautiful grain on the drawer fronts.


Antique Furniture Lecture at the Old School in Waterford,VA

Georgian Mahogany Grandfather clock (ca. 1750)

$
0
0
The Completed Clock
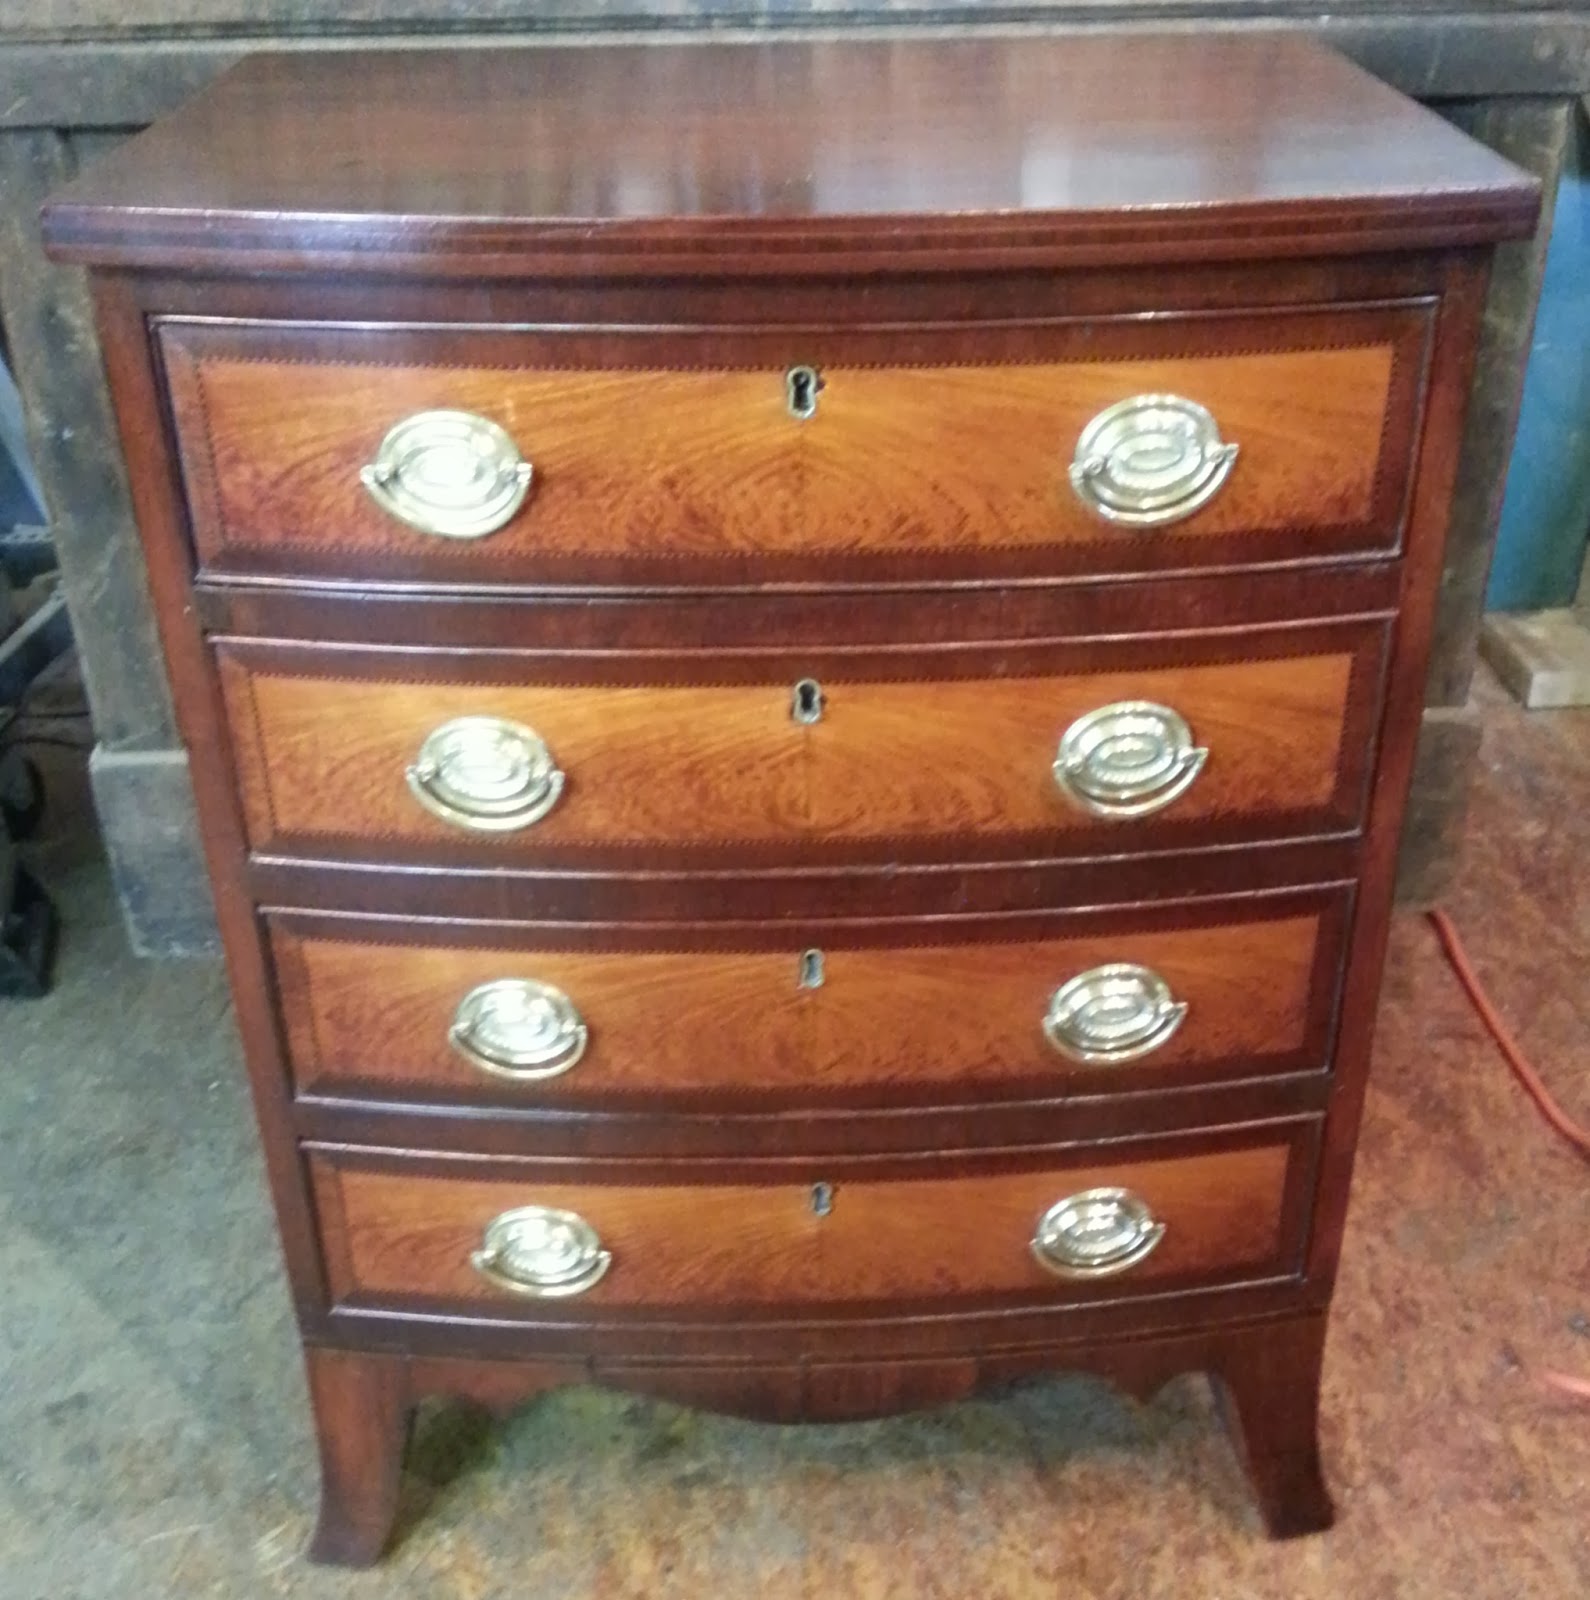
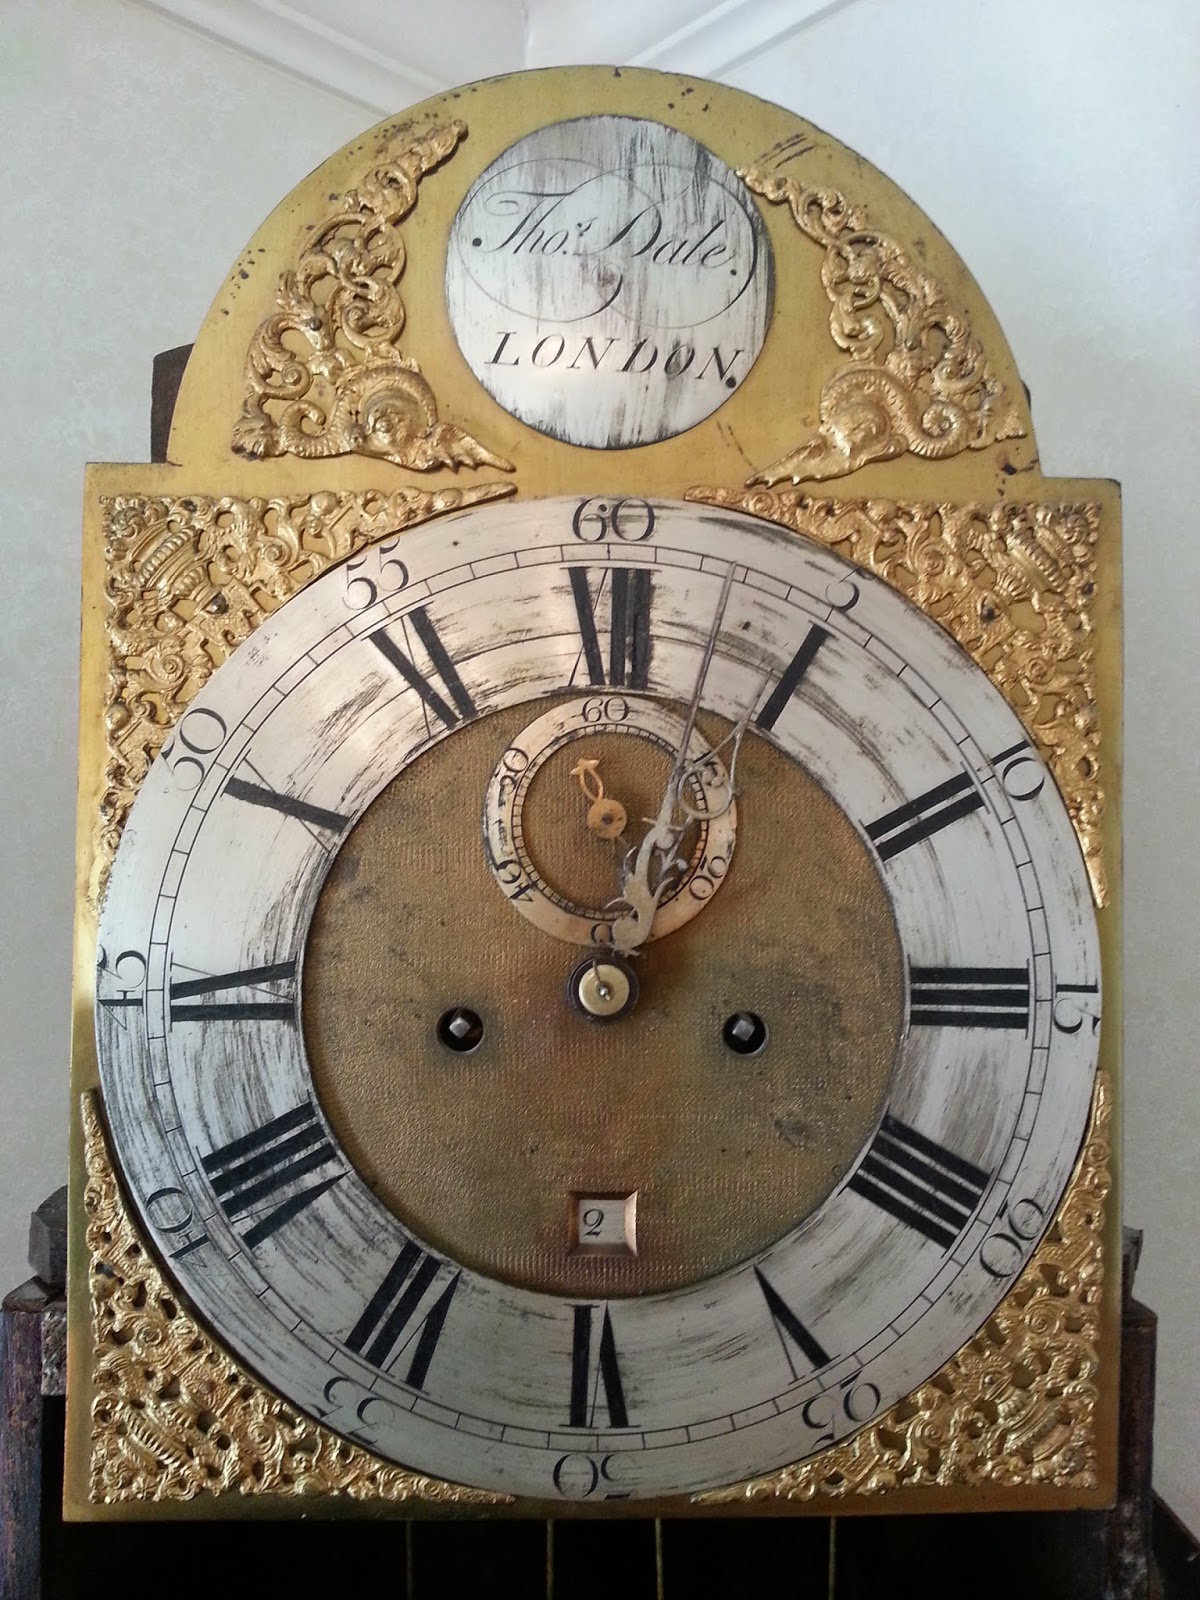
  A recent project was the restoration of an English grandfather or longcase clock made in London ca. 1750. The case shows Rococo influence which was popular in England during the middle period of the 18th century. This particular clock case houses works by Thomas Dale of London. Below is a photo of the brass dial with silvered chapter ring and name plate followed by a close up of the name plate.

The works appear to be eight day time and strike and include a hand that recorded the passing of seconds in addition to the minute and hour hand. Below is a photo of the works.
The case itself was built from English oak veneered with fine West Indies mahogany. The mahogany was inlaid with banding made from several woods and the back of the case was made from elm. Pine was also used throughout as a secondary wood.

While I could not find working dates of Mr. Dale, the case design itself seems to be associated with the clockmakers of London, as the name plate demonstrates. In researching this clock, I found several examples of this case design an all of the examples I saw were associated with London clockmakers.

The design specifics mentioned above are mainly seen in the bonnet and the waist door. These London examples had what is refered to as a Pagoda top, with a brass sounding fret centered above the clock face. The sounding fret exhibits the strongest influence of Rococo on the entire clock and I will discuss this further later in the post.

Another  design element common to the London cases was the fluted columns flanking the clock face with stopped reeding made from brass wire. Below the bonnet, The applied molding on the waist door was common to these cases and was additionally seen in some cases on the base of the clock. In this case inlayed stringing was favored over applied molding on the base.

While none of these design element should be seen as being exclusive to London clock case manufacture, the combination of all of these design elements seems to point towards a popular style of longcase made in London during the mid 18th century. The date I ascribed to the case is a guess and the case could have easily been made earlier or later than 1750. If I had to choose, the use of Oak for the case construction would point towards an earlier date as pine was used later in the 18th century. 1750 seems to be a good compromise.

The case was very damaged when it came to the shop and beyond loose veneer, it required the repair of the decorative molding around the waist door and countless other patches and wedges. In addition, the base had separated from the waist and was only loosely attached by nails driven through the veneer. the repairs and restoration of the original finish are detailed below. I have separated the repairs into three sections to keep every thing straight.

The Base

The base of the clock had broken feet, cracks in the veneer, a warped front, and several other smaller repairs that needed to be made. In addition, the back of the base which was made of pine and separate from the waist back, had broken along an old glue line. Below are a few photos of the base once removed for the waist.


As you can see, the base's front and sides were cracked. In addition, the front board beneath the crotch mahogany veneer was warped and needed to be secured from behind. The following photos show the repairs to this section of the clock case.

these first two photos show the secondary wood beneath the mahogany feet, which were cracked. The pine board that supported the mahogany foot had rotted where it contacted the mahogany. I pared this rot away with a chisel  until I got to clean wood and then cut a patch using reclaimed pine to fill the gap, which can be seen in the following photo. After this ground was built back up, the mahogany foot was reattched.

This photo shows the case being glued including the loose back as well as the feet being glued in place.

After the case was stabilized, glue blocks were added to the interior side of the front to bring the face of the front flush and then a wedge was added to fill the crack in the front face.
This photo shows the wedges around one of the sides as well as the cavetto molding that transitions to the waist section being glued.
 This last photo shows the replacement of a glue block on the back right foot.
 
The Waist and Waist Door

The waist section of the clock had loose and missing veneer as well as some structural issues that needed to be addressed. The photo below shows the bottom of the waist section that fits into the bottom of the case exposed. The nails from a previous restoration were removed and the old glue was cleaned so that the two sections could be glued together again.
This photo shows the waist resting on its front and some structural repairs being made to the back and side.
The waist door was a typical tombstone shape with applied molding around the edges and inset stringing to complement the base and bonnet. The door was made from quarter sawn oak and veneered with West Indies crotch mahogany. The applied molding was then applied around the edges onto the veneer. Over time the door had warped a bit making the veneer loosen in many places. In addition, the thin molding which overhung the edges of the door had snapped and cracked in many places.

Several gluing sessions took place to glue all of the veneer down in the central part of the door. The photo below shows this as well as the curved molding being reapplied on the top of the case.
This photo shows a second, less extensive gluing session.
As stated above, the molding was cracked and broken throughout. A long section was very broken on one side with small portions missing. The same was true with the bottom section of the molding. Rather than scrapping this and making new molding, I felt that with a little work this original molding could be salvaged. Below is a photo of the damaged molding.
The first step was to remove the damaged molding and clean the old glue. Then I scored the veneer that rested below it and removed it from the door. This left the oak substrate exposed in this section. I was careful only to remove the veneer that lay under the molding and would otherwise be unseen. The photos below show these cleaned sections. Apiece of mahogany veneer rests on the door that was later used in the repair.

These fragments in the photo below are the bottom section of molding snapped into three pieces.
In the place of the veneer that I removed, I cut new veneer that I would apply to the back of the repaired molding. Instead of having the veneer lay with the direction of the grain the same as the molding, I cut it so that it would run perpendicular. This gave a bridging reinforcement to the molding much in the same way that plywood works. The sections of veneer are laid next to a piece of molding in the photo below (and yes, that is a paper cutter I used to cut the veneer that the pieces are laying on!)
This close up shows how the veneer was laid with the grain running perpendicular to the grain of the molding adding strength to the molding.
The next photo shows the long section ready to be attached to the door and then being attached to the door with the help of many small clamps. Once the glue dried this proved to be a strong repair and the molding was level with the other molding since I had removed the old venner prior to attaching the new.


The Bonnet

The bonnet had many loose areas and the top boards were completely removed and glued back in place. They were also lined on the interior with canvas to give strength to the thin boards. The photo below shows many sections being repaired. Since the glue takes a while to dry, it is important to do as much in one gluing session as possible.
A close up of the same repairs.
Another repair.
A crack in the molding that surrounds the bonnet door was stabilized with a wedge inserted with glue and then carved flush. This first photo shows the crack followed by another photo showing the wedge.

The bonnet sides were composed of four boards to allow for sidelights (allowing the works to be viewed from the side of the bonnet). These boards were veneered over with mahogany. Over the years the board shrunk and cracks developed where  the boards were joined. These were filled with wedges as seen below.
The last part of this section refers to the sounding fret. The sounding fret is a piece of pierced brass that sits above the face of the clock and allows the bell to be heard unobstructed. This particular sounding fret was cast from brass. Some can be seen cut from wood and lined on the back with silk. As I sat to write about this I opened up John Bly's Antiques Masterclass published by Millers and found a statement that described this piece and its decorative function on the clock. "The widespread appeal of the Rococo style stemmed from the fact that just one small element of it could be applied to the plainest item and thus lift it into fashionable status- a "C" scroll on a plain table, an acanthus leaf on the handle of a simple jug, or a raffle scroll on a clock face can gladden the heart of a collector scouring a boot sale today." (1)

While this clock is certainly not "the plainest item", the idea that one piece of decoration can give definition to the overall style of a piece can be seen here in full force. The cast sounding fret shows a plentiful array of scrolls and architectural elements that have a sort of asymmetrical symmetry that defined the rococo style. The break from the earlier baroque ideas of symmetry and order are clearly demonstrated and a statement of nature and its own balance that was so much admired by the artists and craftsmen of the 18th century is visible in this single piece of hardware. Nowhere else on the clock case is such sophisticated and detailed decoration seen. Likewise, the sounding fret has the effect of tying in the case to the face of the clock, which should rightfully be the focus of the entire piece. Below is a photo the sounding fret before cleaning followed by another photo of the cleaned hardware. 


The Completed Clock

These last few photos show the completed clock after the finish was restored. The original finials were missing when I received the clock so new ones were furnished by Londonderry Brasses (http://www.londonderry-brasses.com/). They were actually hand delivered with several others by the owner of the company who was passing through, and we fit different finials to the case until we found the right ones. Thanks Nancy!

The restored case
The restored base section.
A closeup of the bonnet showing the sounding fret and the finials.

These last few photos show the clock at home with the works installed.


(1) Millers John Bly's Antiques Masterclass Copyright Octopus Publishing Group Ltd. 2005

National Woodworking Month Woodworker Spotlight: Herbine Hardwoods

$
0
0
 I found out recently that April is National Woodworking Month and, while I must admit that I thought that at first this was a gimmick to try to sell stains and tools, I thought about it and decided it would be a great opportunity to showcase some wonderful woodworking talent that I have come across in my journey as a woodworker. I have thought of a diverse group of individuals who are doing exciting things with wood that I will do my best to write about throughout the month of April.

When assembling a list in my head earlier today, I decided to start where I start with a project, the sawmill. This is where it all begins (with the exception of the forest!) and where crucial decisions are made that will influence the entire project. From wood selection and grain matching to moisture content, choosing the right wood for a piece of furniture is essential.

When I am looking to start a project, the first person I call is Rick Herbine at Herbine Hardwoods. Based in Lucketts, Virginia, Rick has been sawing logs as long as I have been involved in woodworking. Every time I go to his mill to purchase some wood I am immediately drawn to the bookmatched slabs leaning against the barn side to dry displayed side by side. To me, this is like going to an artists exhibition and some of the most fantastic figure I have seen has graced the side of Rick'sbarn.

While it is true that there are many sawmills around the area, I have always found Rick to be personable and knowledgeable about his product. As for the product, The wood that I have purchased from Rick has always been exceptional. Below are a few photos of some bookmatched slabs he has sawn. The photos were taken from his Facebook page which I have put a link to after the photos. Below that is a link to his website as well. If you are in the need for some beautiful wood, this should definitely be your first stop.

 Two bookmatched Ambrosia Maple slabs. The brown streaks in this maple surround areas where the Ambrosia beetle has bored into the wood. Whether this is a defense of the tree itself, or something that the beetle does to the wood, I am unsure, but the results are fantastic.
 Two walnut crotch bookmatched slabs.
 A second crotch bookmatched walnut set.
If you are in the need for Appalacain hardwoods either cut into boards or in natural edge slabs, give Rick a call. I am sure you will be impressed!


National Woodworking Month Woodworker Spotlight: David Esterly

$
0
0


About a year ago I somehow became aware of a book written by a lime wood sculptor. I think I found a review of it online. After ordering the book I was amazed by the story as well as the talent of the author, David Esterly. The book is called The Lost Carving: A Journey To The Heart Of Making

In his book, Mr. Esterly chronicles how during the 1980's, he was asked to restore a 17th century carving made by Grinling Gibbons for Hampton Court in England. The ornamental carving had been badly damaged in a fire and it was the authors task to restore the damaged carving as well as recarve lost sections of the carving. 

While the book tells this story, it also gives insight into the mind of the artist and creator. In additon, Mr. Esterly carefully considers the process of restoration and conservation. The blend of all of these concepts is what inspired me and gave meaning to the subtitle of the book. When a person takes on the challenge of restoring an item, they find themselves looking at that item from many different angles to try to get a fuller picture of the intent of the creator. I was immediately drawn to this concept as it is what I do all of the time.

The comparison between Mr. Esterly and myself stops there! This man can not only write but he can carve. A look at his website shows the incredible detail that is achieved in his carving. I was beyond words when I first viewed his work online. His carvings seem to defy what is possible with wood and dazzle the observer with their intricacy. 

 Below is a photo of his book and I urge anyone interested in art or the creation process to read it . I find that I keep buying copies of it and giving them away! I have also included several photos of his work and a link to his website. I am pleased to pay homage to such an artist and woodworker on my blog and encourage the reader to pursue this man's creations.


National Woodworking Month Woodworker Spotlight: Binh Pho

$
0
0
 
 
About five years ago my cousin Tom Ronayne visited us from his home in Dublin, Ireland. Tom, an accomplished wood turner and shop teacher in Dublin, had flown over to see his family living in America and also to attend the American Association of Woodturners convention which was being held that year in Richmond, Virginia. While I considered going myself, I was bound by other commitments, which happened to also be in Richmond. It was agreed that my wife Karen and I would pick Tom up on our way back home and drive together after the conference. 

On the trip home, Tom spoke to me of this turner that had really impressed him. This turner was Binh Pho. Mr. Pho's specializes in thin walled vessels which he then decorates with airbrushing, carving, pyrography, and pierced sections. The result is wood transformed! His pieces are truly breathtaking to behold and if you are interested in his work, please follow the link to his website to view his work and read his biography. A talent like this is worth a month of appreciation on its own! below are a few examples of his work.


National Woodworking Month Woodworker Spotlight: John Warner

$
0
0
 Locally, There were laddderback side chairs, arm chairs, and rockers made in Loudoun County for much of the 19th century. These chairs are commonly known as "Waterford Chairs" because many were made in Waterford, Virginia and the originator of the form, John Mount, lived and worked in Waterford. Other makers chose to repeat this form throughout the county in places like Lovettsville, Hamilton, Hillsboro, and Middleburg, VA. Common characteristics of the side chairs are two arched slats in the back and the rear posts terminate in an acorn finial.

That being said, one of the things that I find so interesting is the diversity in the the design elements in these chairs. Each maker had his own interpretation of the form and often within his own sub-form their are many variations on that form. Sometimes one design element might only be seen in one chair. It is as if these chairmakers were constantly tweaking the design in search of the perfect visual presentation. This is true in the side chairs and especially the rockers.

While each of these makers deserves his own page in this celebration of woodworking (especially Mr. Mount, the father of Waterford chairs), I chose to spotlight John Warner, who in my mind developed perfection of the Waterford chair form. While the design changes are subtle, They make for a visually and structurally superior chair.

The biographical information I have on Mr. Warner all comes from a book written by the authority on the subject, Dr. Fred Johnson Jr. called "Nineteenth Century Loudoun County, Virginia Chair Maufacturing". A link to this book can be found at the bottom of this post. According to Dr. Johnson, Mr. Warner worked as a chairmaker in Hamilton, Virginia for another chair maker and then later in a partnership. Later he moved to Ashburn, Virginia where he continued to sell and possibly make these chairs. All of this seems to have taken place in the last thirty years of the 19th century.

These chairs that Mr. Warner made appear at first glance to be much like any other chair made in the region. The key differences are both in his personal visual touches to the design of the chair and also some structural differences that played key roles in making a quality chair.

The design elements that are specific to Mr. Warner's chairs are in the back posts and the front stretcher. The back posts are the same diameter as most chairs made in Loudoun County, but the difference is that below the finial the post achieves full diameter and then quickly tapers to a smaller diameter by the time it reaches the level of the seat frame. This taper gives a visual lift to the back of the chair and seems to give move visual importance to the crest rail. The smaller diameter at the seat frame also lend itself to stem bending , which is a component of all of these chairs. Just above the seat frame, the rear posts are bent around 5 degrees to give the back a rake, making for a more comfortable chair. This bend is achieved by steaming the wood and then bending it. The smaller the diameter, the less time required for steaming. With this smaller diameter, Mr. Warner was able to facilitate steam bending while also adding visual interest to the piece.

The other visual characteristic of his chairs was the incorporation of a ornamented front stretcher below the seat. While purely decorative, this also added interest to the chair. Warner's stretchers  in general seem to be thicker allowing for a stronger chair.

Structurally speaking, His chairs were made from quality timbers that give weight and strength to the chairs. Mr. Warner also incorporated a seat frame made from boards and shaped with a draw knife. This frame used in the place of turned stretchers, was much sturdier and was also strong enough to resist warping and inward stress from the splint seat.

In general, it seems that while Mr. Warner was following an existing form, he carefully considered this form and made changes to it that were visually appealing and structurally superior to many of his contemporaries. While the changes are subtle, I find his chairs to be most desirable (and comfortable)! It is the mark of a master craftsman when one can make a piece where visual and structural design complement each other, instead of working against each other, which is so often the case. Hats off to Mr. Warner and his Hickory Splint Bottom Chairs! Below are a few photos of some of his chairs.


National Woodworking Month Woodworker Spotlight: Mark Sfirri

$
0
0

 
 Todays choice in my month long homage to woodworkers is Mark Sfirri. I first read an article on Mark Sfirri several years ago in a woodworking magazine and was captivated by his novel approach to turning and furniture design. Sfirri incorporates multi-axis turning into his work, creating sculptural pieces that extend the limits and range of the lathe. In woodturning, there are generally two ways which person can turn wood, face plate turning, which creates bowls and vessels, and turning between centers. This definition in itself is very lacking and people seem to be pushing the limits in every way possible. As far as turning between centers is concerned, the basic idea is that a piece of wood is suspended between two centers, and one center is connected to a motor source which turns the wood.  A blade is then presented to the wood perpendicular to the piece producing shavings and turning the wood round. This is how table legs and bed posts are produced.

By turning a piece of wood and then resetting one of the centers so it is offset from the original axis, you can get interesting results. This practice, known as multi-axis turning, has been around for centuries and is used in producing oval handles for hammers and also what is known as a country Queen Anne  (or turned Queen Anne)leg. Mr. Sfirri uses this concept to create whimsical and often humorous turning and sculptures. Below you will find bats twisted in knots and a table that looks like it is ready to pounce. Every time I come across one of his turnings I am tempted to put down whatever I am doing and start turning!. For this reason, Mark Sfirri was one of the first people I thought of when I decided to honor woodworkers.


National Woodworking Month Woodworker Spotlight: Martin Fair

$
0
0
A few miles from my shop, off of  Harpers Ferry Road in Loudoun County is a shop near the top of a mountain ridge that separates "Between the Hills" from the Loudoun Valley. The shop is owned and operated by Martin Fair (pictured to the right above) who along with Stuart Orser (Pictured above left) build some of the most beautiful instruments ever created. The company is called Fairbuilt Guitar Company and a link to their website and Facebook page (which I urge you to visit) are located at the bottom of this post.

I have known Marty for about 25 years and during this time played music with him in what was once a collective groupe of musicians called the Furnace Mountain Band. As the years rolled on, Marty went off to school at the Roberto-Venn School of Luthiery in Phoenix, Arizona. When he returned, he was armed with the skills and tools of a Luthier and he has never looked back. Since then his shop and business have continued to grow and today Marty and Stuart are regularly turning out instruments with grace and beauty, not to mention great tone.

One of the first things that drew me to these instruments is Marty's command of the art of inlay. The intricate inlays that adorn the fretboards and headstocks of his instruments are flawless. Together Marty and Stu are building instruments of the highest standard and best quality as can be seen in the photos below. If you are in the market for a stringed instrument (or have one on need of repair as I often do) Fairbuilt Guitar Company should be your first stop.


Two Empire Chairs (ca.1800)

$
0
0

The Completed Chairs

 Recently I worked on two chairs made in France circa 1800. It is a little difficult to firmly put these chairs in one stylistic category, although I conservatively lean towards the French Empire Period which lasted roughly from 1804-1814, I have good reason to think that at least the arm chair was made prior to 1800 which strictly speaking would put that chair in the Directoire-Consulate period (1795-1799) that bridged the gap between the Louis XVI period and the Empire period. Both chairs are made primarily of Mahogany with Beech used as a secondary wood. The chairs  are also decorated with Bronze Mounts that were once coated with a gold and mercury amalgam called Ormolu, in which the mixture is applied to the cast bronze and then heated, removing the mercury and leaving a thin layer of gold applied to the bronze. Over time this layer has been removed by cleaning, but evidence of the original gold was visible in many places.

the arm chair in particular was very broken and the customer and I decided the best course of action was to remove the upholstery so that I could access the broken areas better and make better repairs. Ultimately this meant removing the back from the chair and dismantling it. Below is a photo of the chair as it came into the shop followed by some photos of the damage to the back legs of the chair.


Upon removing the upholstery from the chair, I found a signature on the rear seat stretcher. the signature was written in India ink and appears to say "Filjame" followed by a date of either 1798 or 1793. This date was very hard to read and the more I looked at it the more I felt like it could say something else! Below are some photos of the signature.


I spoke with the Metropolitan Museum of Art in New York City concerning the signature. The museum houses a large collection of Continental furniture and so I figured they might know of this maker. The had not heard of him, but suggested that this could also be the signature of an upholsterer. My feeling about it is that it is the signature of the cabinetmaker due to the interior prominence of the signature. This signature is well executed and centered on the interior of the rear seat stretcher. It was meant to be seen ( once the upholstery was removed) and it almost seems to exude pride in workmanship. Although this is all speculative, it is my feeling on the matter.

As far as the date is concerned, being signed in the 18th century would make the chair older than the Empire period by a few years. All of these styles evolved and several design motifs spanned periods, especially when they were short lived. The tendency we have to place a piece of furniture in a specific period is relatively modern, and to the maker and the original owner, it would have been a chair made in the latest fashion. Either way , it is a well made chair that employs beautiful West Indies mahogany and great design.

Once the chair was dismantled, the first step in repairing it was to glue all of the broken pieces in place. These were all centered around the joinery in the back of the chair, in one case where tenons for a seat stretchers meet the rear leg and in another, where the crest rail is joined to the rear leg. In either case, these areas were weakened by removal of wood to create mortises and further weakened with the introduction of pegs, used to secure the joints. At first, these joints were sound and the loss of wood was countered by tenons glued in place. After 200+ years, the glue failed and the wood became brittle, leading to the structural failure. Below are a few photos of the broken pieces being glued in place on the right rear post (The direction is given as if you were facing the chair).


The left rear leg, seen below was in much worse shape.

Here is the left rear leg after it was glued back together.
One problem in this leg was that when the joinery was pegged, the holes from the pegs broke the internal shoulder of the mortise, making this shoulder structurally pointless. I decided to rectify this by removing a bit of wood and putting a patch that would be solid and bridge the lower and upper parts of the leg. Again, the location of this mortise is at the seat stretcher/leg intersection.

To create this patch, I employed a new method for me. It involves creating a negative space for the patch with a stacked dado blade (picture a bunch of round table saw blades sandwiched together in the table saw). I first clamped the leg to the table saw fence and secured it in position, and then raised the blade into the stationary leg. This can be seen below.

Leg clamped to the fence, the blade is lowered into the table.
Detail of the photo above.
While the blade was running, I slowly raised it into the wood, removing the damaged material and creating a negative space in the diameter of the blade.
Below is a photo of the leg with the arced negative space cut by the dado blade.
A similar procedure was done on  the other leg, where the crest rail met the right leg.
A close up of the damaged area.
The damaged area being removed by the dado stack.
Once the negative spaces were made. I milled a piece of mahogany to the exact thickness of the space cut by the dado stack. I then used a compass to trace an arc at the same diameter of the dado blade. I then cut the arc out on the band saw, giving me a patch that fit perfectly into the negative space made by the dado blades. Below is a photo of me scribing the arc. I clamped a piece of poplar to the mahogany to give a center point of the compass and then drew the arc.
Clamping the patch on the rear right leg.
The patch on the rear right leg once it was pared flush with a chisel.

The patch at the seat level on the rear left leg before and after it was pared flush.

Drilling out the patch on the rear right leg to create a mortise that would accept the crest rail tenon.
The completed mortise.
I learned of this method of patching by discovering it's use in a chair I was reparing. While not handwork, I like this patch because it is an effective method of repair and can be concealed within the workpiece a lot easier then a hand cut patch. I have used it in several scenarios and have found that it works great every time.

The side chair was in far better shape structurally and really all that it needed was to have the finish cleaned and the upholstery changed to match the armchair. Here is a photo of the side chair as it came to the shop.
A close up of the ormolu mount on the splat. Neoclassical themes abound!
To clean the Ormolu, I decided to use alcohol on a soft rag in opposition to an abrasive like fine steel wool. This would preserve any gold left on the bronze. Below is a photo of the same hardware cleaned.


Here is a photo of the side chair with the finish restored ready to go to the upholsterer. Because I did not need to fix any structural problems on the chair, I left the upholstery on and the upholsterer removed it.
This photo shows the arm chair restored and ready to be upholstered.

These final photos are of the chairs once they returned from the upholster.


Making a Key for an English Lever Lock

$
0
0
Every Time I restore a chest of drawers or cabinet that has locks, I take the locks out of the piece, clean them, and, if no key is present, I cut a new key that works the lock. After I cut the new key, I always think to myself "I should have taken pictures of how I did that!". So this time, I did.

The lock in question was a lock out of an English armoire I have been restoring. The piece was signed and dated October 11th, 1902, so I know that the lock is about one hundred years old. The type of lock is called a lever lock, which I will describe below. If you are interested in learning a bit about antique locks, take a look at this article on them:

http://www.worthpoint.com/blog-entry/keys-to-antique-furniture-locks

One of the most important things to have when you are making keys for locks is a large stockpile of keys of various shapes and sizes. I collect old 19th and 20th century keys that can often be re-cut to work a lock. I also have several new keys which look old and are uncut, giving me the widest range of possible cuts to make in the key.

Below is a photo of the lever lock, with the key I chose to work with to the right. This is a reproduction Barrel key that I chose because the outer diameter of the key shaft fit the hole in  the lock case and the blade was a little too long, giving me plenty to work with. A barrel key is one where the end of the shaft is bored out so that it can fit over a post in the lock.
The very first step is to remove the lock housing from the lock. This is held to the lock with two metal tangs that fit into mortices in the lock plate, which are peened over. By hitting the ends of these tangs with a screw driver you can release the housing from the lock plate, revealing the mechanism within. This second photo shows the lock with the housing removed.
As stated above, this lock is known as a lever lock. What this means is that besides the bolt which is moved by the key to engage the lock, there is a gate known as a lever that is also moved so that the bolt can be engaged. As the key turns in a lock, the blade length has to be right to engage the bolt as it swings around. The blade length needed to move the lever is different, so a second cut is needed to move the lever simultaneously. A tab of brass is attached to the bolt that moves with it, and passes through a window cut out of the lever. The cut on the key must move the lever enough to move this tab from one side of that window to the next and over a little ridge. This is also what keeps the lock in an open or closed position. Too much of a cut on the key will not push the lever into position for this to happen. Too little of a cut will make the lever move past the position it needs to be in.  Sometimes their can be up to three levers all requiring different cuts on the key, making this a tricky lock. This lock had one lever, so it was relatively simple to work on.  One other thing I might add is that the lever also has the spring attached to it which provides tension for the lock. If one were to try to remove the lever (making life simpler), the lock would not work. Below is a photo of the lever removed from the lock. we will get back to that later.
After the lever is removed, it is important to make sure that the key can pass through the lock housing and that the blade is long enough to engage the bolt and throw the lock. The key I chose fit all of the criteria with the exception that the blade was a little long. This is a good thing, because it is easy to file off the excess metal. The trick is to not file off too much metal, or the key will not work the lock and you need a new key. The photo below shows two keys from the same batch. The one on the left is the one that I cut for this lock. if you look at the blades, you can see that the one on the left is a bit shorter.
Below is a photo of the lock plate and the bolt. You can see in the lock plate where the previous key has left circular scratches from being turned over and over again. In this photo the bolt is in the thrown position.
Once the key blade was cut to the right length, it turns on the post and engages the bolt, moving the bolt back and forth from locked to unlocked position. In addition to making the blade the right length, it is sometimes important to round the corners of the blade so it engages the bolt smoothly. The next three photos are of the key working the bolt.


Once this was accomplished, I brought the lever back into the equation. Upon doing this I realized that the key blade and shaft was not touching the lock plate. While not critical, this could potentially interfere with the lock working properly and put unnecessary strain on the post, so the answer was to bore out the hole in the end of the key a bit so the key sat firmly on the lock plate when it was fully pushed into the lock. This also is important for alignment with the various components in the lock, including the lock housing. Below is a photo of the key before. you can see that the key is sitting high and off of the lock plate.
In this photo, the key has been bored out and the key is resting on the lock plate.
After this was accomplished, the second cut was made to operate the lever. This is seen in the photo below as a notch taken out of the lower right corner of the key blade. If you find an old key with notches taken out of the bottom edge of the key, that key was originally used to operate a lever lock.
The next few photos show the key operating the lock with the lever in place. The spring (which looks like a bobby pin) is seen to the right of the key going off at a diagonal. This would be compressed against the side of the lock housing and keep the lever under tension.


Once it was determined that all of the cuts and key adjustments were working I oiled the parts and put the lock housing back in place, putting the lever under tension. I then tried the key which operated the lock successfully. This can be seen in the last two photos below.

It is slow and fine work, but as long as a lock is in good shape, a new key can be made for it and it can operate successfully. One word of caution. If you are trying this yourself, make sure that if multiple locks are going to be using the same key, that you try the key in each lock to make sure it works. sometimes the key needs to be further adjusted for multiple locks and often, a lock will have been replaced, that will use a separate key entirely. Also, make sure the key locks and unlocks the lock successfully with the door or drawer not in the case. This way, the lock can be removed and the key adjusted. The worst case scenario is that the key throws the lock, but does not unlock it,and you have done this in the case, so the lock is locked and cannot be unlocked easily!

In the time that this furniture was made, it was important to be able to lock a piece of furniture that housed your personal belongings. In the 18th century, houses did not often have locks, and it would be an important security measure to keep you chests and wardrobes locked up. In today's world, this is not a necessity, but I feel that it is an important part of the restoration of the piece I am working on. If it is possible to get a lock (or locks) working again I will make sure they operate well.

Signed Edwardian Wardrobe (1902)

$
0
0

The Completed Wardrobe
 The period in furniture history known as Edwardian lasted form 1901 to 1910 and coincides with the reign of Edward VII, son of Queen Victoria. The style shows a clear movement away from the more ornate and richly carved Victorian furniture of the previous century, a change that had been set in motion in the later half of the 1800's. What this style came to embrace were clean lines an largely unadorned furniture. Exemptions to this would be floral motifs. The general idea was to bring to the consumer furniture that was uplifting and cheery. The wardrobe that I worked on was no exception to these ideas. The piece was made of Mahogany and American Tulip Poplar and for the most part followed a rectilinear form. The cornice featured egg and dart molding and the broken arch pediment and upper panels on the side doors featured carving in keeping with the Edwardian design aesthetic.

Overall the piece was in working order and beyond general repairs, the main issue was that the wood had bleached on the exterior to a light yellow color. The interior was largely spared from this, but portions had lightened up a bit. After examining the finish, I decided to retain the original finish and stain into it to try to bring the exterior color in line with the interior. Below are a few photos of the wardrobe as it was when it entered the shop.


As stated above, there were several repairs to be made. The first was a large portion of the corner of the cornice that was missing. below are two photos of the damage.

I cut patches and cut away an area of the cornice to receive the patches. Below is a photo of the patches being glued in place.
The completed repair, made from two patches, sanded and ready for stain.
The broken arch pediment had once had a finial. The finial had probably been knocked off at some point and lost. In the process, the mortise for the finial had been broken out on the backside of the pediment. below is a photo of the damage.
The next two photos show the mahogany patch being glued in place. after it was glued, it was pared down and later a new finial was put in place.

this photo shows a panel that covers the back side of the mirror being repaired.
Likewise, this next photo shows repairs made to the case.
The astragal molding that was glued to the center door overlapping the edge of the adjacent door was loose and broken. the lower edge of the molding had broken off and was missing, so it was patched as seen in the photos below. The molding was then glued back in place.


This photo shows the two outer doors. The panels were removed for staining. The one on the right has been stained while the one on the left shows the bleached color.
The central door pivoted on two knife hinges, one on the top of the door and one on the bottom. The basic idea is that there are two rectangular plates of brass that are drilled out so that one can be screwed into the edge of the door and the other into the case. They have another larger hole drilled on one side. the plate on the door side gets a metal pin fixed in it and the other does not. once the pin is inserted and the door is hung, the door opens by pivoting on this pin, one on the top of  the door and one on the bottom.

The hole on the receiving plate with no pin on the bottom side of the door and inserted in the case had become worn and enlarged. It was made from brass and was taking the full weight of the door. Below is a photo of the hinge part with the worn hole all of the way to the right in the photo.
I decided to remove this whole part and replace it. I replaced it with a part I fabricated myself, but instead of brass, I used steel which will wear better. The replacement part can be seen in the photo below below the original. This allowed the door to swing freely.
 
These last repair photos show a strip of beading I made used to hold the floating panels in place in the door. The replacement beading is on the left and is unstained in the photos.

These next couple of photos are of the completed wardrobe with the restored finish and the pediment attached.


As stated in the title of this post, the wardrobe was signed. It reads "J Westhead of 174 Friargate Preston Oct 11/02" . Mr. Westhead was a cabinetmaker in Preston, England, which is a town in Lancashire not far from Blackpool. The piece was completed on October 11th of 1902. The piece was signed on the bottom of one of the short linen drawers held in the right side of the case. The large 5 written in pencil indicated the placement of the drawer in the case and has nothing to do with the signature. below are some photos of the signature.


Since Mr. Westhead wrote his address down I decided to look him up! Unfortunately, 112 years is a long time to be in business and he must have moved on. Currently, in his old shop is a Mcdonald's restaurant as seen in the photo below. Perhaps Mr. Westhead had a shop on the ground floor and lived above. At any rate, it is great that he signed his piece and added to the rich history of this fine wardrobe.


Locust and Bog Oak Urn (2014)

$
0
0

The Completed Urn
  I usually do not post things of a personal nature on this blog, but the purpose of this blog is to chronicle my journey as a woodworker and the various projects that I take on. This post concerns the passing of my father, James Francis Power, and my creation of an urn to house his cremated remains. My father was born on May 10th, 1929 and passed on May 24th, 2014, aged 85 years. He had many titles during his life, Father, Priest, Federal Mediator, Pilot, Soldier, among other things. To me he was not only my father, but he was also one of my biggest fans and while the path I chose was different from the one that he may have liked, He always supported me and helped me to keep the deeper meaning of craft and craftsmanship in mind. Below is a photo of my father taken sometime in the 1990's in Taiwan:

This is how I remember him. Very photogenic and with a pipe in his mouth.

Soon after my father passed away I started thinking about making an urn to house his ashes. Immediately I thought of making a box out of locust. In particular, lumber I had milled from a locust tree that had grown beside the stone wall next to our house. My parents had cut the tree down several years ago and I had asked them to have it cut into eight foot lengths, so that I could have it milled into lumber to build the dining room table that I am now writing this post on. Here is a photo of my family taken in the late 70's on that stone wall. The tree can be seen in the photo directly behind my father. My aunt Janet is on the far right and yes, the baby in the picture is me.


Over the years I have used the wood for various projects, and the pile of lumber has dwindled.  As I thought about the project I felt pretty confidant that there was enough wood to do the job.

The next thoughts were of design. I immediately was drawn to a design I use for jewelry boxes. To see some of my other work using this design, you can follow these links:

http://johnmarkpower.blogspot.com/2011/12/walnut-and-maple-jewelry-box-2011.html

http://johnmarkpower.blogspot.com/2009/03/first-entry.html

The basic design for the box is that there are four sides to the box that all have mitered corners. The top and bottom are floating panels held in place by the four sides and the mitered sides are held together with splines inserted as keys into each side, creating joinery. Most of the time I like to make the splines from a contrasting wood to show them off and add visual interest to the piece.

Another element I wanted to incorporate was our family coat of arms. The Power family were with Duke William of Normandy at the battle of Hastings and were granted lands in Devon, England for service to him. By the year 1200 they had settled in Ireland where our family came from. Below is an image of the family coat of  arms.


The shield image had a field of white on the bottom with a field of black on the top. a zig-zag line separates them. My father was very proud of his family lineage and  was proud to display this coat of arms when ever he got the chance. After he retired he had business card made up with this as his logo. It seemed a fitting way to commemorate him to incorporate this shield on the box.

It suddenly dawned on me that the perfect wood to contrast the locust from our family home would be bog oak from Ireland. Bog oak is oak which is found in Ireland and other parts of the world that has been preserved from decay by being submerged in the bogs. The acids in the bog not only preserve the wood but turn it jet black. I was first introduced to this wood by my cousin Tom Ronayne of Dublin, Ireland. Tom is a turner and woodworker who works with bog oak among other woods and has over the years presented gifts of his creation to my family, often out of the bog oak. Most notably for me is a bowl turned from a massive piece of bog oak that Tom turned for my wife and I when we were married. I got in touch with Tom, who I knew was coming over to America for the funeral, to see if he had any scrap bog oak he could bring with him to use in the urn. He said he had one piece left that he had been saving and that I was welcome to it if I wanted it. Within days, I was face to face with Tom and he handed the perfect piece of bog oak over to me.

One other feature of  Bog Oak that I have neglected to point out is that when it is preserved in the bog it can be preserved for thousands of years. The piece that Tom gave me was dated to be 5,500 years old. This sense of permanence gives the wood special meaning and importance and seemed like the perfect choice for this urn. While the locust I was working with was not nearly as old (probably around 80 years), it also instilled a sense of permanence in me. Locust is traditionally prized as a wood that will last against the elements and also with ground contact. For this reason, it is used for fence posts and other jobs that require these strengths. I remember walking my parents land as a boy and coming across old locust fence posts that had been standing long before my family came to be caretakers of this land. The old saying about locust is that it lasts "fifty years less than stone"! Both woods were perfect candidates for my father's urn. Below is a drawing of the box that I designed to hold my fathers ashes. The top of the box has a border of inlaid bog oak that frames the shield from the family coat of arms. The shield is recessed into the top creating definition and the field of white (in this case locust colored). The field of black, made form bog oak is inlayed into the shield and is flush with the top. Bog oak is also use for the splines at each corner.

One other interesting fact about bog oak is that it was used in 19th century Ireland to create Mourning Jewelry. Mourning Jewelry was first developed in the 17th century and reached its peak in popularity during the Victorian period. Mourners would wear a broach or pendant made from bog oak for several months during the Mourning period. This association with death and mourning seemed to seal the deal for me.

Now that I have explained the rational behind the design of this box I will proceed to show the process of making it.Below is a photo of the locust boards I had for the project. The wood had deteriorated a bit, but I was able to get what I needed for the project.
Here are the usable lengths after they were milled. The boards came from the outside of the tree so I had to work around sap wood and bark as best I could.
I did not have boards wide enough to make the sides out of one board, so the sides, top and bottom were all glued up out of two boards each. I matched the grain as best I could to hide the glue line. Below is a photo of the boards being clamped while the glue dried.
Once the sides were glued, I cut them to the proper dimensions and cut the mitered corners. The four mitered sides are seen below with the inner face facing up.
Assembled, the four sides looked like this:
The next step was to plow a grove to receive the top and bottom boards in all four sides. The top and bottom were rabbeted so that the tongue on each side of the top or bottom would fit into this groove. Below is a photo showing the top inserted into the four sides.
Next I set to work on creating the shield and the recess for the inlayed border. This was a mix of hand work and work with a router. Below the recessed shield shape and the recess for the inlay can be seen. Around the edge of the shield I scribbled with crayon so that I could see the line I was cutting to better. This was later sanded off.
Below is a photo of the bog oak piece that Tom gave me. It is followed up by a closer photo of the piece.

The piece was not wide enough to orient the grain running up and down, so I cut the bog oak into four pieces and glued them together to make up the black part of the shield. The glued up piece can be seen below fitted into the recessed shield.
The next step was to cut the diagonal zig zag pattern into the bog oak. In this photo the inlayed border is also seen in place.
Gluing the bog oak in place.
After the bog oak was glued in place, I planed it flush with the locust top. I was struck by the beauty of the wood shavings and took a few photos of them. I saved the shavings for something in the future. I just could not see throwing them away!

The completed top.
After the top was finished, I rounded off the upper edges of the sides and test fit the entire box, as seen below.

Before sealing up the box, I cut a recess on the inside of the top to hold the photo of all of us seen above in front of the locust tree. It is seen below.
When I have made these boxes in the past, I learned to assemble them with packaging tape. It serves as a good clamp while the glue dries. After the box is glued, the top is parted off with the table saw so you have a lid and a bottom. In this case, I did not want the box to open so I did not part off the lid. Because of this, the contents were sealed into the box during the gluing process.

After the glue had set, the last step was to cut the kerfs for the keys in the mitered corners. This is done with the help of a sled that moves across the saw blade and holds the box at a 45 degree angle. The sled is seen below.

I marked where I wanted the cuts to be and used a stop block clamped to the sled to make sure my cuts were in the same location on each corner. Below is are some photos of the sled in use.


Below is a photo of the urn with all of the kerfs cut.
The keys were made of bog oak and cut to size to minimize the amount of waste.
This photo shows the keys in place as the glue dries
After the urn was completed and sanded, I put a simple wax finish on the exterior to give it a bit of a shine.


These last photos of the urn were taken outside of my house in the morning on Monday, July 7th, The day of my fathers internment at Culpeper National Cemetery. The first photo at the top of the post with the flowers was taken by my sister Elizabeth at the internment. It was a beautiful ceremony which my father would have loved.


Viewing all 57 articles
Browse latest View live